-
Notifications
You must be signed in to change notification settings - Fork 3
Getting Started
Fluxo is a simple, lightweight and dependency free framework based on Facebook Flux and Backbone.js.
Fluxo provides to your app (don't worry if you don't understand wet, we'll go through them soon):
- Object and arrays wrappers that emit change signals, very useful to warn a view layer to reload when one of them change.
- A very simple actions hub.
- A way to connect stores on your React.js components.
##The sample app
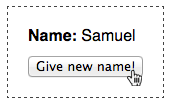
Let's create a super simple app that shows some person name and have a button to change it like this:
At first glance you already are saying "I can do this with one line of vanilla JS", and ok, you can, but this very simple example is only to show the most basic implementation of a Fluxo app. Fluxo proposes a structured and predictable way to create dynamic apps that relies on an unidirectional data flow instead of "manually poke" DOM.
##Store
A good start point to a Fluxo app is instantiate a store that will hold the state of your app. The initial state of our app will be the informations about the presented person.
var personStore = new Fluxo.Store({ name: "Foo Name" });Every time that I need change this store's data we'll invoke specific methods provides by Fluxo.Store to change this data. Example: if you need set a new name you follow this:
personStore.setAttribute("name", "My new name");We'll see soon for what we are using this setter.
All store's data lives on data property.
personStore.data.name // => "Foo Name"##View layer
The view layer will present our state, which we are holding on the personStore instance created above.
It needs follow three important rules.
- It only presents the current state of the attached store.
- It need be ready to reload itself when the attached stores change.
- It never changes the state directly. When our user execute some action on the view layer that need change our state, it just calls a specific object (which we'll talk about soon) that have this competence.
On our example app we'll use React.js. The Fluxo already contains a way to attach a store on a React component, the Fluxo.ConnectStore. All we need to do is call the function within the component and stores.
var PersonComponent = React.createClass({
  render: function() {
    return (
      <div>
        <p><strong>Name:</strong> {this.props.person.name}</p>
        <button>Give new name!</button>
      </div>
    );
  }
});

PersonComponent = Fluxo.ConnectStores(PersonComponent, { person: personStore });

React.render(<PersonComponent/>, document.getElementById("app-container"));
As you can see our attached store's data lives on the component's props upon the this.props.person property (line 7).
Every time that you call the Fluxo.Store setter, this component will receive the new data and we'll set this new state on our component, which will reload. This behavior is brought by a wrapper component created on Fluxo.ConnectStores.
##Action layer
The action layer is where you should put the mediation code. Example: when our user click on a button on our view component that should give a new name to our presented person, this click event will invoke an action on the action layer that will mediate the intended result.
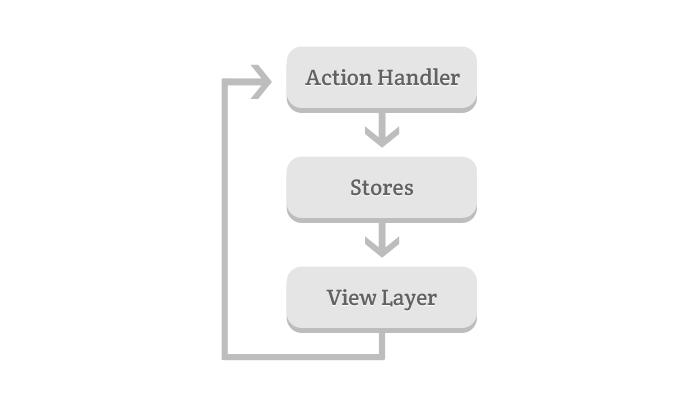
If you have a good eye you noticed that we have a unidirectional flow on our app expressed on the image below. This makes our app much more easy to understand and predict what some action will do, once we have the action routine on a specific place.
Using the Fluxo#registerActionHandler we register an action handler that groups related actions.
Now we'll register the Person action handler:
var personActionHandlerPrototype = {
  initialize: function (personStore) {
    this.personStore = personStore;
  },

  giveNewName: function (newName) {
    this.personStore.setAttribute("name", newName);
  }
};

Fluxo.registerActionHandler("Person", personActionHandlerPrototype, personStore);
The params order are:
- Action handler identifier.
- Action handler prototype.
- Arguments that are passed to initialize action when your handler is registered.
As you can see we registered it with two actions, the initialize action, that are called on the action handler registration and the giveNewName that receive one argument, a new name.
We also passed to the initialize action the current person store instance that we make available internally on the action handler through the this.personStore property.
##Putting all together
Now we need create the click handler on our component that gives a new name to the presented person.
This click handler will use the Fluxo#callAction that invokes an action on ours previous registered action handler.
The params order are:
- Action handler identifier that you want call.
- The action name.
- The arguments that are passed the action.
We'll call the giveNewName action on Person action handler with a new name generated randomly.
var PersonComponent = React.createClass({
  onClick: function () {
    Fluxo.callAction("Person", "giveNewName", Math.random());
  },

  render: function() {
    return (
      <div>
        <p><strong>Name:</strong> {this.props.person.name}</p>
        <button onClick={this.onClick}>Give new name!</button>
      </div>
    );
  }
});

PersonComponent = Fluxo.ConnectStores(PersonComponent, { person: personStore });
Now you click on the button, the action giveNewName is called, the store is updated and emits the change signal and the view reacts on the changes presenting the new state. Awesome, isn't it?
And it is, a very simple Fluxo app. I hope that you have understand and don't forget to read the full Fluxo documentation, React.js documentation and Facebook Flux documentation.
###Some examples

