In this project, you will create a database-driven Web application that a mom-and-pop restaurant could start using to help them with their order system. In it, you will create the ability to
- Have a menu
- Have tables in the restaurant with identifiers
- Associate an order with a table
- Then, have a small workflow where, the ordering process
- The host marks a table as sat marking it as occupied
- A server enters an order for the table
- The cashier closes out the table marking it empty
This is an ambitious project. If you've ever worked in the hospitality industry, you know that this is the lifeblood of a restaurant. A good restaurant management system can make its developers a comfortable amount of money.
You'll perform the following steps in the project, each constituting a section.
- Set up the environment
- Create the login/logout workflow
- Create the code to represent menus, menu items, and menu item types
- Create the code to represent tables
- Create the code to represent an order
- Create the views to power the workflow described above
In this project, you're going to need the following dependencies.
- Flask: you know, the thing that makes the Web application run!
- python-dotenv: to enable loading of configuration from
.envand.flaskenvfiles - SQLAlchemy: so that you don't have to write SQL, anymore
- Flask-SQLAlchemy: so that SQLAlchemy and Flask work together like cousins on good terms
- Psycopg2: the package that allows SQLAlchemy to connect to PostgreSQL
- WTForms: to make and validate forms
- Flask-WTF: to make WTForms and Flask work together like office mates that don't hate each other
- Flask-Login: so you don't have to write the login stuff yourself
Don't worry about that last one, Flask-Login. This project will walk you through every step of implementing it with clear instructions and code so you don't have to go muck around in the Flask-Login documentation (though you should look it over).
You may ask yourself, "Why are they including something that I haven't seen, yet?" Now that you're mostly through this course, you're prepared for this. In your day-to-day job, you'll often seek out new libraries, tools and, frameworks to get your job done. This is what happens in real life, so now that you've learned and implemented your authentication back in Express, it's time to see what using a library is like.
Create a directory for your project, something like "order_up". Change your working directory into it. (Do you even need to be reminded of that, anymore?) Install all of your dependencies.
pipenv install Flask python-dotenv SQLAlchemy \
               Flask-SQLAlchemy psycopg2-binary \
               WTForms Flask-WTF Flask-Login \
               --python 3.9.6
Activate your virtual environment. That's pipenv shell.
Install linting and refactoring support for your virtual environment.
pipenv install --dev pylint pycodestyle ropeNow, create a database user, password, and database. You've probably done this, what, 20 times, now? Here's some SQL for you.
create user order_up with password '9uCxydbt';
create database order_up_dev with owner order_up;
Create your .gitignore file for the project.
curl https://raw.githubusercontent.com/github/gitignore/master/Python.gitignore > .gitignoreInitialize a Git repository. Add and commit the current files.
Create the following directories in your project folder to get the basic Flask app running. (This does not list the files and directories that already exist.)
.
├── .env
├── .flaskenv
├── app
│   ├── __init__.py
│   ├── config.py
│   └── routes
│       ├── __init__.py
│       └── orders.py
└── order_up.py
These instructions repeat what you did previously to set up your project. These
instructions repeat what you will do in the future to create new Flask
applications. This project has more complicated routes, so you'll create more
than one route module. That's why routes is a directory, this time, rather
than a single file.
In the .env file, put this content to set the current Flask environment to
development and provide a secret key. (Feel free to make your secret key even
secreter.)
FLASK_ENV=development
SECRET_KEY=qp02348jrqj43rpqj34pqjr
In the .flaskenv file, specify that the order_up.py file is the Flask app.
FLASK_APP=order_up.pyIn the routes/orders.py file, create a new instance of the Blueprint class
named "index" that handles route the top-level route of "". Then, define a route
for a function named "index" that handles "/" and returns the string "Order Up!"
from flask import Blueprint

bp = Blueprint("orders", __name__, url_prefix="")


@bp.route("/")
def index():
    return "Order Up!"
In the app/config.py file, create a Configuration class that has a static
variable named SECRET_KEY. Then, set it to the value from the environment
variable of the same name.
import os


class Configuration:
    SECRET_KEY = os.environ.get('SECRET_KEY')
In the app/__init__.py file, bootstrap (that means "declare and configure")
your Flask app with the Blueprint from app.routes.order and the
configuration object. This time, give relative imports a try. (See them, there?)
from flask import Flask
from .config import Configuration
from .routes import orders

app = Flask(__name__)
app.config.from_object(Configuration)
app.register_blueprint(orders.bp)
Import the app variable from the app module in the order_up.py file, which is located in your root directory.
from app import appNow, run your Flask application: flask run. Make sure you see that
it's running in the "development" environment.
 * Serving Flask app "order_up.py" (lazy loading)
 * Environment: development
 * Debug mode: on
 * Running on http://127.0.0.1:5000/ (Press CTRL+C to quit)
 * Restarting with stat
 * Debugger is active!
Open up http://localhost:5000 and see "Order Up!"
With a working Flask application in place, it's time to integrate SQLAlchemy via the Flask-SQLAlchemy extension.
Create a new file named app/models.py. In there, you will import the
SQLAlchemy class from flask_sqlalchemy and create a new instance of it,
setting it to a variable conveniently named db.
from flask_sqlalchemy import SQLAlchemy

db = SQLAlchemy()
Back in the app/__init__.py file, import the db variable from the models
module. Then, pass the app variable into the db.init_app method.
from flask import Flask
from .config import Configuration
from .models import db   # New import
from .routes import orders

app = Flask(__name__)
app.config.from_object(Configuration)
app.register_blueprint(orders.bp)
db.init_app(app)  # Configure the application with SQLAlchemy
This differs from the way that you saw in the article Using SQLAlchemy With
Flask. The article's configuration was for a small Web application. This one is
going to be larger, so the models are in their own module. That means you have
to initialize the app with the init_app method rather than using the
SQLAlchemy constructor as you saw in the article.
Refresh your Web page and make sure you haven't introduced any runtime errors. If all still looks the same, it's time to add a database URL for SQLAlchemy to use.
If you look in your Terminal, you should see some warnings that look like this.
UserWarning: Neither SQLALCHEMY_DATABASE_URI nor SQLALCHEMY_BINDS is set.
Defaulting SQLALCHEMY_DATABASE_URI to "sqlite:///:memory:".
...
FSADeprecationWarning: SQLALCHEMY_TRACK_MODIFICATIONS adds significant
overhead and will be disabled by default in the future.  Set it to True
or False to suppress this warning.
It would behoove you to get them to stop warning. In the app/config.py file,
add the SQLAlchemy-specific configuration values, SQLALCHEMY_DATABASE_URI and
SQLALCHEMY_TRACK_MODIFICATIONS. Please refer to Using SQLAlchemy With Flask
for how to add those. When you've added those, add the DATABASE_URL setting in
the .env file. (Think of why should it go in .env rather than .flaskenv.)
DATABASE_URL=postgresql://order_up:9uCxydbt@localhost/order_up_devTo get login and logout to work, you'll follow these steps.
- Create an
Employeemapping class that will work with SQLAlchemy to store data in the database and retrieve it from there. - Integrate Flask-Login to use that
Employeeclass. - Make a WTForm for login
- Write a route that handles login
- Write a route that handles logout
- Protect "home page" that people can see after logging in
- Write a database script to create and seed your database
- Make a logout form
Referring to SQLAlchemy Mappings and Using SQLAlchemy With Flask, in
app/models.py, create an Employee class that inherits from db.Model AND
the UserMixin class from flask_login. This is the first time you've ever
seen a class inherit from more than base class, which is something fairly unique
about Python that it lets you do that. Here's what the first line looks like to
do multiple inheritance.
from flask_login import UserMixin          # New import
from flask_sqlalchemy import SQLAlchemy

db = SQLAlchemy()


class Employee(db.Model, UserMixin):  # Your class definition
    # Mapping attributes, here
Now, create mapping properties for the attributes listed in the following table. It should have a table name of "employees".
| Attribute name | SQLAlchemy data types | Length | Constraints |
|---|---|---|---|
| id | Integer |
primary key | |
| name | String |
100 | not nullable |
| employee_number | Integer |
not nullable, unique | |
| hashed_password | String |
255 | not nullable |
You haven't seen the unique constraint, yet, for SQLAlchemy column mappings.
Here's a link to the Column documentation. Look through that and see if you
can find the way to make a column have a UNIQUE constraint.
Besides the mapping attributes that you just created, add some methods to handle password management. There's a crypto library that came with Flask, so you'll use its methods.
Add a new import in the import section of app/models.py.
from werkzeug.security import generate_password_hash, check_password_hashThat is similar to the bcryptjs library that you used in Express.js.
Then, in your Employee class after the mapping attributes, add these methods
that you will use to perform the login.
@property
def password(self):
    return self.hashed_password

@password.setter
def password(self, password):
    self.hashed_password = generate_password_hash(password)

def check_password(self, password):
    return check_password_hash(self.password, password)
Now that you have a Employee class, you can integrate Flask-Login to use it.
In the app/__init__.py, you're going to configure Flask-Login. In there, add
an import for the LoginManager to the import section of the file.
from flask_login import LoginManagerThen, on the import for .models, add Employee to the line.
from .models import db, EmployeeAt the end of the file. They perform the following steps.
- Create the login manager for your application to protect routes.
- Instruct the login manager to use the "session.login" Blueprint function (not created, yet).
- Configure the
LoginManagerto use yourload_userfunction to getEmployeeobjects from the database.
login = LoginManager(app)
login.login_view = "session.login"


@login.user_loader
def load_user(id):
    return Employee.query.get(int(id))
Now, you will create a login form for people to use to login.
Like you've done previously, you will create a WTForm using the Flask-WTF extension.
Create a new file at app/forms.py to contain your form. In there, declare a
class named LoginForm that inherits from FlaskForm from the flask_wtf
module. Refer to the Calendar This! project to see how to do that. Then,
create field definitions for the following fields that will appear in the form.
| Field name | Field type | Validators | Label |
|---|---|---|---|
| employee_number | StringField |
DataRequired |
"Employee number" |
| password | PasswordField |
DataRequired |
"Password" |
| submit | SubmitField |
"Login" |
You haven't seen PasswordField, yet. It's up to you to figure that one out.
(Hint: it works just like all the other fields.)
With all of that set up, you can now create the view that employees will see to login.
Create an app/templates directory. In there, you will create two files, a
shared base.html that contains the boilerplate Jinja, and then a file named
login.html. Just like Pug.js had template inheritance, so does Jinja.
In base.html, put this Jinja.
<html>
  <head>
    {% if title %}
      <title>{{ title }} - Order Up!</title>
    {% else %}
      <title>Welcome to Order Up!</title>
    {% endif %}
  </head>
  <body>
    {% block content %}{% endblock %}
  </body>
</html>
In login.html, put this Jinja. It tells Jinja that it "inherits" from the
base.html template. That means, just like you saw in Pug.js, the content in
block content will get injected into the template in base.html where it
also reads block content.
{% extends "base.html" %}

{% block content %}
<form method="post" action="{{ url_for('.login') }}">
  {{ form.csrf_token }}
  <div>
    {{ form.employee_number.label }} {{ form.employee_number }}

    {% if form.employee_number.errors %}
      <ul>
        {% for error in form.employee_number.errors %}
          <li>{{ error }}</li>
        {% endfor %}
      </ul>
    {% endif %}
  </div>
  <div>
    {{ form.password.label }} {{ form.password }}

    {% if form.employee_number.errors %}
      <ul>
        {% for error in form.employee_number.errors %}
          <li>{{ error }}</li>
        {% endfor %}
      </ul>
    {% endif %}
  </div>
  <div>{{ form.submit }}</div>
</form>
{% endblock %}
Notice the use of url_for in the action attribute. The value ".login" means
to go to the route handled by the login function in the current Blueprint.
You will put this in another Blueprint, one that has to do with sessions rather
than orders. Create a new file, app/routes/session.py, and create a new
Blueprint object in there with the name "session" that handles routes with an
url_prefix of by "/session". Please refer to the app/routes/orders.py file
to do that.
In the app/__init__.py file, import this new session module and register its
Blueprint like you did the one for orders.
Create a route in app/routes/session.py that handles "/" for a method named
login. Then, put this code in there. Python is meant for readability, so
read the code to understand what you put in there.
# The use of @bp, here, assumes you named the variable "bp"
# that holds your Blueprint object for this routing module
@bp.route("/", methods=["GET", "POST"])
def login():
    if current_user.is_authenticated:
        return redirect(url_for("orders.index"))
    form = LoginForm()
    if form.validate_on_submit():
        empl_number = form.employee_number.data
        employee = Employee.query.filter(Employee.employee_number == empl_number).first()
        if not employee or not employee.check_password(form.password.data):
            return redirect(url_for(".login"))
        login_user(employee)
        return redirect(url_for("orders.index"))
    return render_template("login.html", form=form)
Notice the uses of url_for in this method. For the ones that read
"orders.index", that means it'll use the index method governed by the
Blueprint named "orders" that you defined in the app/routes/orders.py file.
To see this page, go to http://localhost:5000/session/. This code above
introduces some NameError exceptions to appear when you try to view that page.
The NameError occurs when you're using a variable or class name that you
haven't defined or imported, yet. Figure out the imports that you need to add to
make the NameErrors resolve. Then, you will see the form you built!
For example, the first one where it doesn't know current_user. Ask yourself,
"What part of this application deals with the idea of current users?" If you
answered Flask-Login, you win! So, you'd add the current_user to the import
list that you have for flask_login.
Handling logout is much easier than login. Here's the code for that. Put it in
the app/routes/session.py file.
@bp.route('/logout', methods=["POST"])
def logout():
    logout_user()
    return redirect(url_for('.login'))
What does the function url_for('.login') return?
You can't get to the logout path, yet, because it's a POST and you need a form to do that. You'll do that in a couple of sections down.
Turn your browser's attention back to http://localhost:5000. You want this page
to be guarded against access from people that have not logged in. To do that,
you use the login_required decorator from flask_login. In the
app/routes/orders.py file, import that login_required decorator and apply it
to the index function in there.
# In the imports section, add this
from flask_login import login_required

# Make your index function look like this
@bp.route("/")
@login_required
def index():
    return "Order Up!"
Now, when you refresh the page, it should redirect you to the login form!
Remember, that came from the setting in app/__init__.py where you specified
that the login_view of the LoginManager object should be set to
"session.login".
Now, it's time to create an employee and test that login functionality.
There are no migrations in SQLAlchemy. To use those, you need another tool named Alembic which you will learn about in later lessons. For now, you can create a script in the root of your project directory that you can run to create and populate your database.
Create a file named database.py in the root of your project. This script will
destroy and recreate your database every time it's run, so beware. Create the
script and run it with this command: python database.py.
from dotenv import load_dotenv
load_dotenv()

# Regardless of the lint error you receive,
# load_dotenv must run before running this
# so that the environment variables are
# properly loaded.
from app import app, db
from app.models import Employee


with app.app_context():
    db.drop_all()
    db.create_all()

    employee = Employee(name="Margot", employee_number=1234, password="password")
    db.session.add(employee)
    db.session.commit()
Now, you can try to log in with the employee number 1234 and the password
"password". You'll end up getting a couple more NameError exceptions. Deal
with those and refresh your browser each time to see if there are any left.
Eventually, you'll see the Order Up! page, again!
The last thing to do is put a logout button in the base.html and actually
create a real "home" page.
In the app/templates directory, create a new template named orders.html.
Have the new Jinja template inherit from base.html. Refer to
app/templates/login.html to see how you did it before. Then, the block
named "content", put an h1 element with the content "Order Up!". Have the
index function in the app/routes/orders.py render that template. When you
refresh your page, you should see a big, bold Order Up!, now, with the title
in the browser tab reading "Welcome to Order Up!"
In app/templates/base.html, hard code a form with the method "POST" and the
action url_for("session.logout") containing a single button that reads
"Logout". When you refresh your browser, you should see that button appear at
the top of the page. Click it to see if you logout. You should...
Yay! You do! (Or, you don't. If you don't, fix your error.)
The problem is that, now that you're on the login page, there's still a Logout
button there! To take care of that, Flask-Login has added the current_user to
the variables available to you in the templates. The current_user object has a
property on it named is_anonymous. Wrap the form you wrote in the base.html
with a conditional that will only show the form when the current user is not
anonymous.
You've got the full circuit of login and logout done! Great work! Now, it's time for you to create menus.
A menu consists of a collection of food items categorized by type: entrees,
beverages, sides, etc. That statement identifies three entities or models
for the data layer: Menu, MenuItem, MenuItemType. So, here are some
attributes for each of those. Create mapping classes in the app/models.py file
for each of them.
The table name should be "menus".
Besides the attributes in the following table, it should also have a one-to-many
relationship named "items" to the MenuItem objects.
| Attribute name | SQLAlchemy data types | Length | Constraints |
|---|---|---|---|
| id | Integer |
primary key | |
| name | String |
30 | not nullable |
The table name should be "menu_items".
Besides the attributes in the following table, it should also have a many-to-one
relationship named "type" to the MenuItemType objects. It should also have a
many-to-one relationship named "menu" to the Menu objects.
| Attribute name | SQLAlchemy data types | Length | Constraints |
|---|---|---|---|
| id | Integer |
primary key | |
| name | String |
50 | not nullable |
| price | Float |
not nullable | |
| menu_id | Integer |
foreign key, not nullable | |
| menu_type_id | Integer |
foreign key, not nullable |
The table name should be "menu_item_types".
| Attribute name | SQLAlchemy data types | Length | Constraints |
|---|---|---|---|
| id | Integer |
primary key | |
| name | String |
20 | not nullable |
Once you have those created, go to database.py, import those new classes, and
seed some data by creating instances of the Menu, MenuItem, and
MenuItemType objects. For example, you can start with the following.
beverages = MenuItemType(name="Beverages")
entrees = MenuItemType(name="Entrees")
sides = MenuItemType(name="Sides")

dinner = Menu(name="Dinner")

fries = MenuItem(name="French fries", price=3.50, type=sides, menu=dinner)
drp = MenuItem(name="Dr. Pepper", price=1.0, type=beverages, menu=dinner)
jambalaya = MenuItem(name="Jambalaya", price=21.98, type=entrees, menu=dinner)
Make sure to add them to the db.session before committing the session. (If you
remember the cascading stuff from your SQLAlchemy reading, you may be able to
get away with adding only one of them to the session and committing it.)
Run your database.py file, again, to recreate your database. Make sure your
data now exists in there. Now that you have food in there, you'll need a place
to sit.
Now, it's time to make the Table model, where presumably customers would sit
from which servers would take orders. Define it in the app/models.py file,
too.
The table name should be "tables". Here are the attributes.
| Attribute name | SQLAlchemy data types | Constraints |
|---|---|---|
| id | Integer |
primary key |
| number | Integer |
not nullable, unique |
| capacity | Integer |
not nullable |
Add some seed data. Write code in database.py to create 10 tables and save
them to the database. Run database.py to seed your data. Make sure that your
tables exist in there. Time to let the employees get to work!
What does the order model do? Think about a restaurant. What is an order from the perspective of the application? Here's a list to think about the data model.
- A table's order consists of food items to be prepared and delivered to the table
- A table's order is serviced by a server
- A table's order begins when they get seated
- A table's order ends when they pay
Take a moment and think about what the requirements for number 1. would look like in the database.
Read the rest of the requirements and think about what other models in the data
model (Employee, Menu, MenuItem, MenuItemType, Table) would be
associated with an order.
Those are the thoughts and questions developers face every day when working with the needs of organizing and storing data.
Seriously, think about how you would store it. Talk with your pair and try to determine one or more database entities that you would need to store this data.
When you get to a good place, you can move forward with your design or use the following design.
If you want to use this Order model, that's fine. You can use yours, too.
It'll just be up to you to adapt the instructions later to meet your model's
definition (or models' definitions).
In this solution, the Order ties together an Employee (the server), a
Table (where the customers sit), and one-to-many MenuItem objects. The
design went like this:
- An order has one employee and one table to it. That means there's a model for
this, call it
Order. What needs to be known for an order?- The employee
- The table
- Some kind of status that shows that it's open or closed
- An order has multiple menu items associated with it. That's another model,
call it
OrderDetail. Each order detail will have a menu item associated with it. Then, each order detail will point to an order.
From that analysis, here's a proposed data model for Order which should be
stored in the "orders" table. It should also have a relationship to the
Employee called "employee" and a relationship to the Table named "table".
You should create a relationship from Employee back to the Order named
"orders". You want to create that because the application will want data that
answers questions like "What are the current user's open orders so I can show
them on the screen?" It should also have a relationship to its details named
"details".
You should create a relationship from Table back to Order called "orders"
that represents the orders for a table. You want this so that you can ask the
database, "Hey, database, please give me a list of tables with no active orders
so I can show them to the host so they can sit a party."
| Attribute name | SQLAlchemy data types | Constraints |
|---|---|---|
| id | Integer |
primary key |
| employee_id | Integer |
foreign key, not nullable |
| table_id | Integer |
foreign key, not nullable |
| finished | Boolean |
not nullable |
Here's the proposed data model for OrderDetail which should be stored in the
"order_details" table. It should have an association back to the order named
"order". It should also have an association to the menu item so that it can use
the price to calculate the total for the order.
| Attribute name | SQLAlchemy data types | Constraints |
|---|---|---|
| id | Integer |
primary key |
| order_id | Integer |
foreign key, not nullable |
| menu_item_id | Integer |
foreign key, not nullable |
If you choose, make those models. Make your own design's models. The rest of the instructions are about querying, routes, and handling POSTs. The database modeling stuff is done, for now.
Now it's time to get data from the database and put data back into the database. That will be awesome. A couple of things before you dive in:
- Don't forget about the
/staticroute provided by Flask. - Don't be afraid to try new things.
You have a choice, here. Get things working, or shoot for the moon.
Come up with the simplest possible Web page that you can to:
- Assign employees to tables
- Close tables
- Add food items to an order
When you get done with those three simple forms, try out this next shoot for the moon goal, or go to the end of the project and try out the Menu management stretch goal.
Here's one possible computer-human interface that would work to power this application.
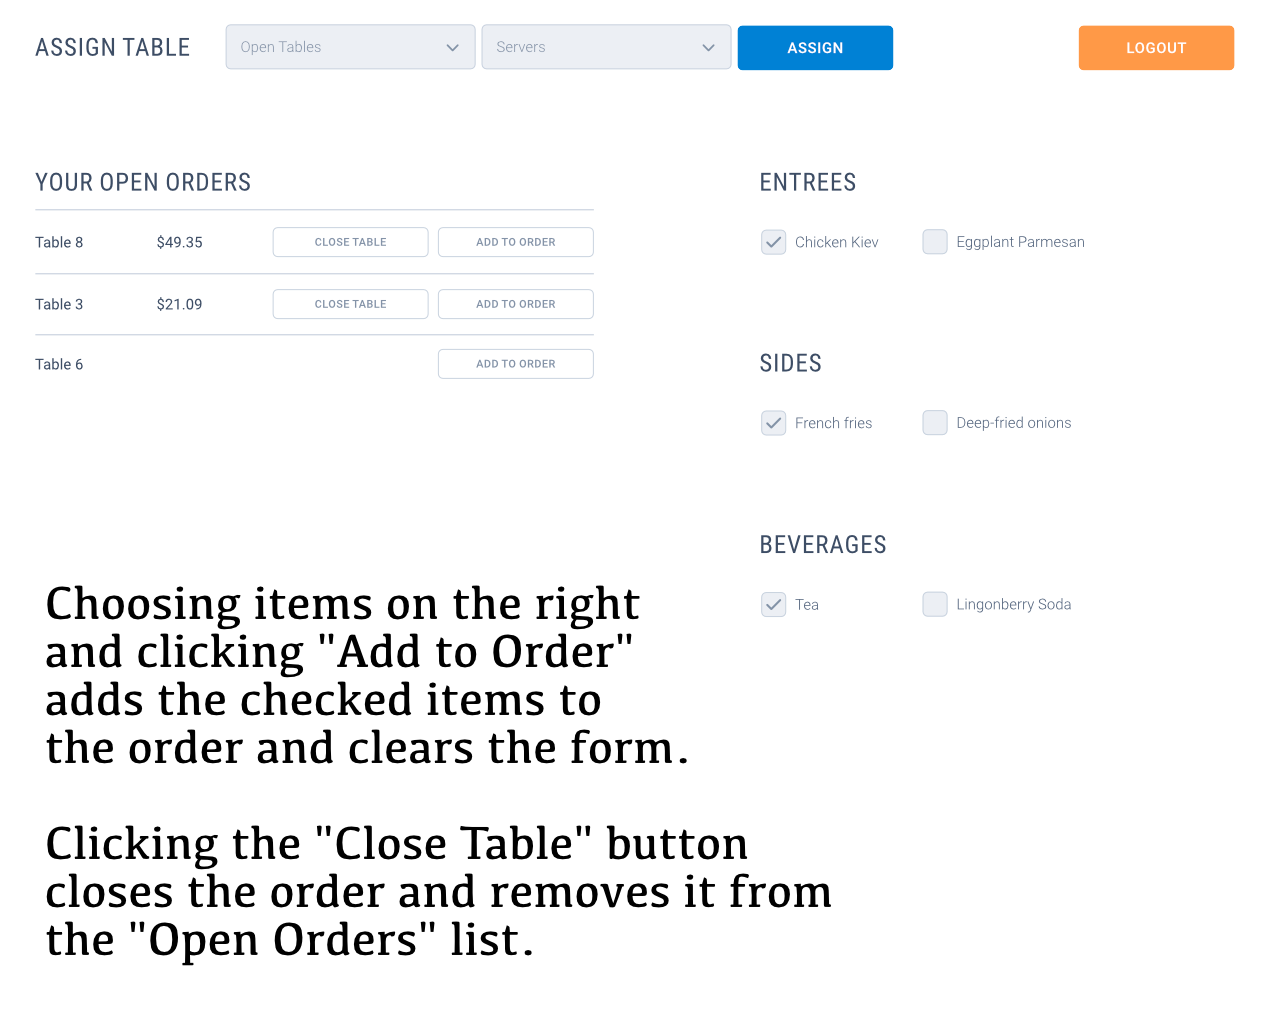
In this design, the index method in the app.routes.orders module would serve
this page. It would require three endpoints to handle the form submissions.
- Assign Table: This endpoint would take the id of a table and the id of an
employee (provided by the dropdowns at the top of the page) and create a new
order with those values. It would then redirect back to
index. - Close Table: This endpoint would take an order id, get the
Orderobject from the database based on the primary key, mark thefinishedattribute toTrue, save it, and redirect back toindex. - Add to Order: This endpoint would take an order id and multiple menu item
ids and create
OrderDetailobjects for each one and save them to the database.
You should be able to do all of that. Those are all primary key queries or just creating new objects, adding them to the session, and saving them.
Make sure you also protect each of them with login_required because the person
who is making those calls should be authenticated.
The hard part is the queries for the main UI. There's going to be at least four
queries that you'll have to do, passing data into the form and render_template
functions for all of those. Also, you haven't used the SelectField, yet, and
it has its own interesting way of working. So, here's some direction for you to
take to get the UI powered like it should be.
Note: don't forget that in all of your forms, you'll want to add your
form's csrf_token so that it'll get past the WTForms forgery blocker.
Consider the form at the top of the mockup. It has two dropdowns and a submit button. You would have a form like this.
class TableAssignmentForm(FlaskForm):
    tables = SelectField("Tables", coerce=int)
    servers = SelectField("Servers", coerce=int)
    assign = SubmitField("Assign")
The [SelectField documentation] has a section entitled "Select fields with
dynamic choice values" which shows that get a list of objects from somewhere
(like a database) and turn that into a list of tuples where each tuple is of
the form (id, value). Then, you set that to the choices attribute of the
SelectField. You put the coerce=int on there when the values that you're
using are int values. The coerce parameter will change the value received
from the browser using whatever function it's assigned, int in this case to
convert it to an integer.
In the view function, the route function, you need a way to get tables that are
considered "open", that is, tables that do not have any unfinished orders. There
are many ways to do this. A straightforward way is to just query all the
tables, then query all of the open orders, remove the tables from the list that
have an open order, and then turn that into the tuples for the SelectField.
That kind of code would look like this.
# Get the tables and open orders
tables = Table.query.order_by(Table.number).all()
open_orders = Order.query.filter(Order.finished == False)

# Get the table ids for the open orders
busy_table_ids = [order.table_id for order in open_orders]

# Filter the list of tables for only the open tables
open_tables = [table for table in tables if table.id not in busy_table_ids]

# Finally, convert those tables to tuples for the select field and set the
# choices property to it
form.tables.choices = [(t.id, f"Table {t.number}") for t in open_tables]
Then, that SelectField will show the appropriate table.
There are other ways to do this, of course, but they rely on more advance SQL techniques. This is straight-forward.
Don't forget that you can print query objects to the Terminal to see what the
actual SQL is. That is a great help in debugging what's going on with
SQLAlchemy and its query builder.
To query for "your orders", you'll need to use the value in current_user which
you already know how to get from the work you did on the login stuff earlier.
What you'll need to do is have a filter for your Order query that contains
the current_user information, but also that the order is not finished.
Just query for the menu items and order them first by menu item type name, then
by menu item name. That requires a query across the join, the join from
MenuItem to MenuItemType. Oddly enough, there are no examples in the
SQLAlchemy documentation on how to do that, so here's an example of how to do it
using the mappings from above.
MenuItem.query.join(MenuItemType).order_by(MenuItemType.name, MenuItem.name)Once you have that, try to figure out a way to group the menu items on a per menu item type.
Please refer to both Querying Data WIth SQLAlchemy and Querying Across Joins In SQLAlchemy on how to query, order, and eagerly load objects, if you choose to do that.
You won't need JavaScript to make the buttons in the table post the form on the
right that contains all of the menu items. You can use the form and
formaction attributes for the button to do that. These attributes allow you to
create Web pages with buttons that submit forms that they're not a part of.
Put an id on the form and set the form attribute on the button to the same id.
Then, generate the URL that you want the form to go to and set the formaction
attribute to that. Example code would look like this.
<button form="food-list" formaction="/orders/3/items">
  Add to order
</button>
That button will submit the form with the id food-list and send it to the
URL /orders/3/items even though the button is not in that form. Pretty neat!
Now, on the other hand, you have to accept a list of menu item ids and process
them. You haven't done that without WTForms. And, that's ok, you can still do
it with WTForms! You just need to create a form using the SelectMultipleField
type. You just have to make sure that you name the checkboxes in the HTML the
same name that you name the attribute in the form class.
class MenuItemAssignmentForm(FlaskForm):
    menu_item_ids = SelectMultipleField("Menu items", coerce=int)
As long as you name your checkbox elements "menu_item_ids", then the
SelectMultipleField will handle them just find. You only have to make sure
that you set its choices to a list of tuples for the menu items.
form = MenuItemAssignmentForm()
form.menu_item_ids.choices = [(item.id, '')
for item in MenuItem.query.all()]Now that you have order management out of the way, create a page that allows you to add or remove new menu items.