1. Basic Usage
The photos show below represents the version 1 of the adapter. The process for version 2 is exactly the same
Due to the way the PO are designed, the adapter will only work if the PO is NOT in sleep mode
If you have the possibility of backing up your Pocket operator settings, make sure you do so beforehand
Please make sure not to touch the pins of the adapter to any metal surface other than the PO while it's turned on. Doing so might damage the damage the adapter
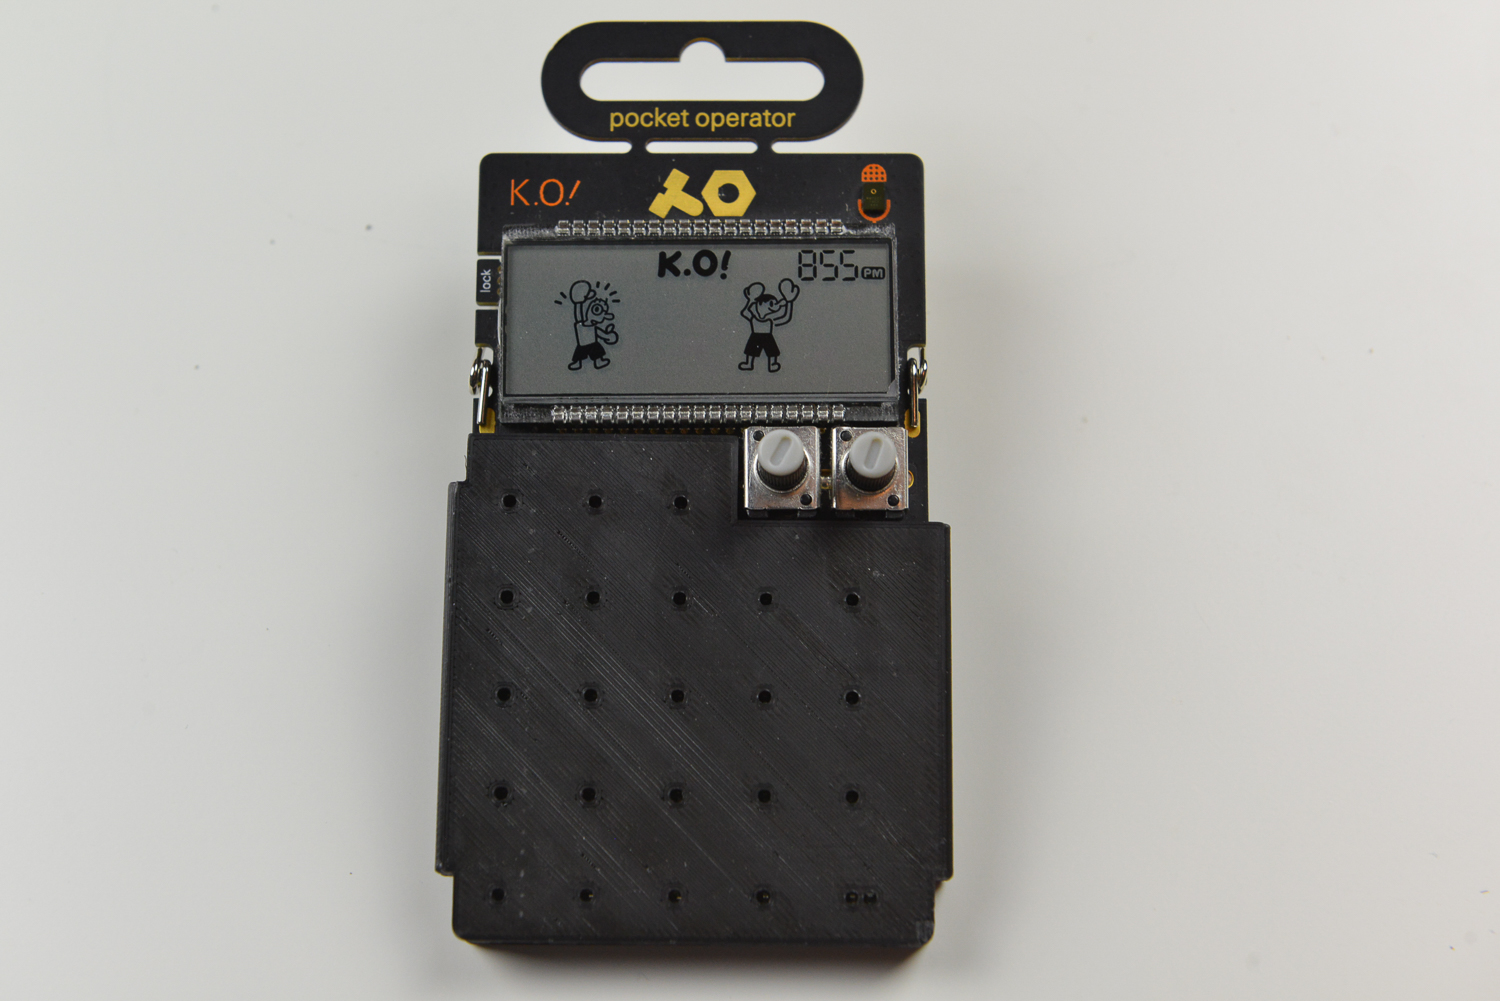
Make sure it's pushed in, the bottom of the cover should be flush with the PO. When the board get inserted into the cover in step 4, it should not trigger any of the buttons on the PO. Depending on the generation of PO, you might have to do some micro adjustment of the cover position.
**You need micro sd card with the config.cfg file inside the directory. Slide the card into the Teensy before powering on. The config.cfg contains MIDI bindings that needs to be configured to your MIDI controller. For information about the config.cfg see section Configure the SD Card below
If you're planning to sync the PO to the adapter, plug in a 3.5 mm cable to the adapter's SyncOut port and the PO's input jack now
4. Plug in your midi controller to the USB-host(black cable) port and power on the teensy via micro USB (white cable)
 If you had the SD card inserted, a successful read will result in the orange LED light blinking 3 times. Otherwise check your card. It might not work with card bigger than 16GB
The white cable can also be plugged to a computer. In this case the Teensy will be recognized as a MIDI device
You can also use a powered USB hub to plug in more than one midi controller into the USB-host port

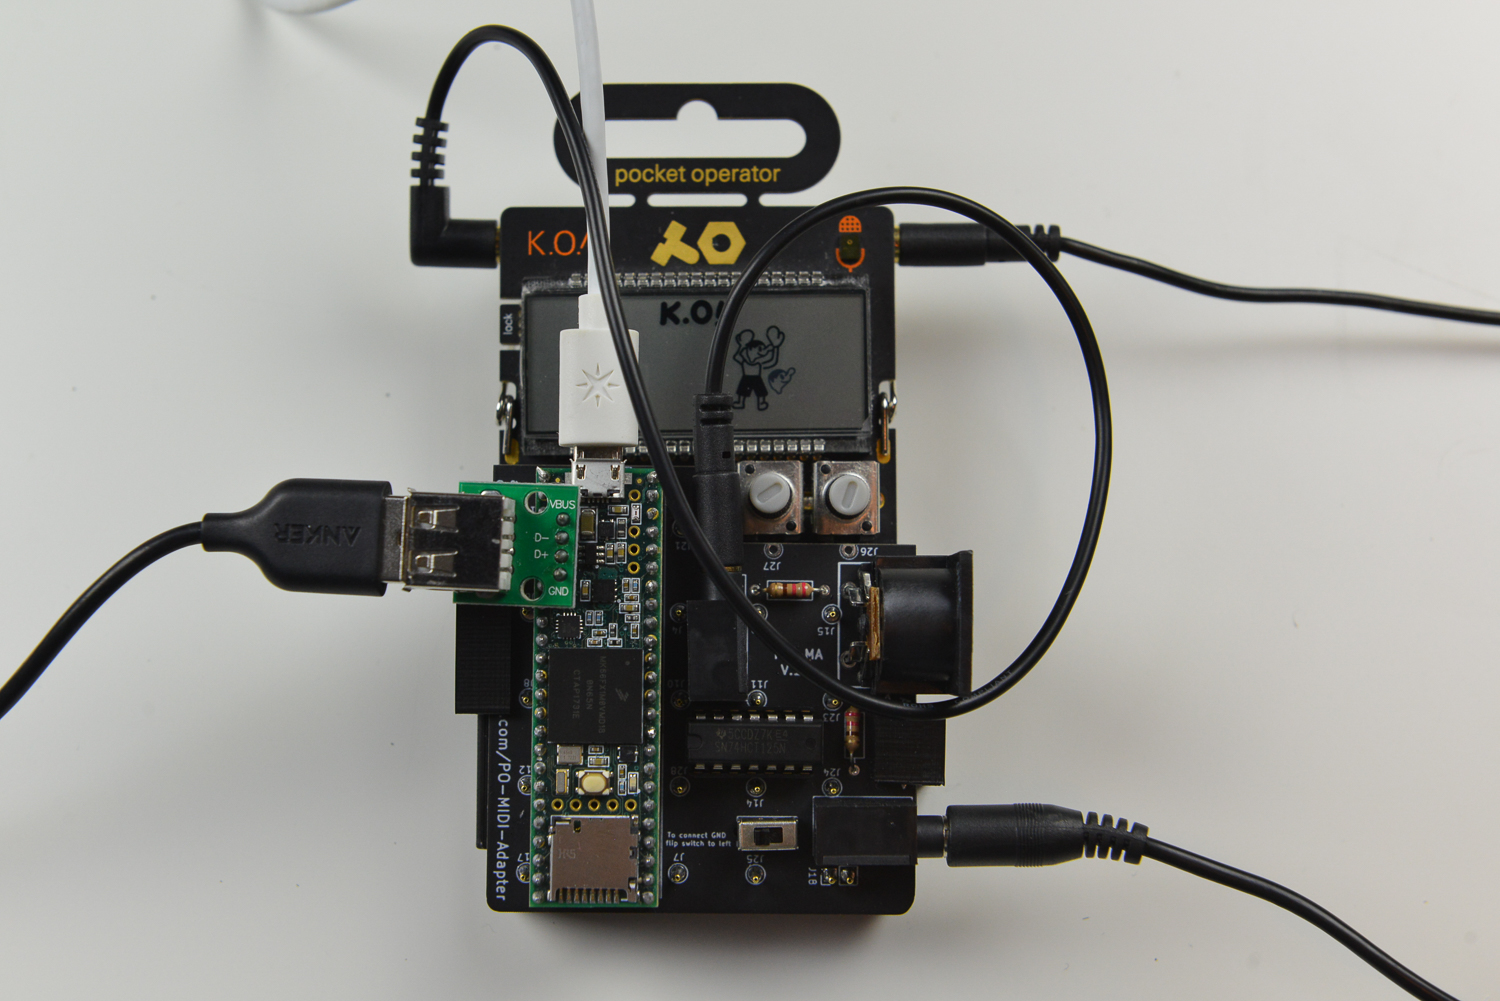 Please do not insert the board if the Teensy is not powered, you might end up trigger random buttons. If you absolutely have to insert without power, make sure the switch is on the left side before doing so.
There is no real reason to flip the switch to the right side, unless nothing is responding. Setting the switch to the right side will bridge the ground between the PO and Teensy, but in my experience, this is usually unnecessary. V2 and V3 boards do not have the switch.
The LED will blink when receiving any MIDI activity from any input.
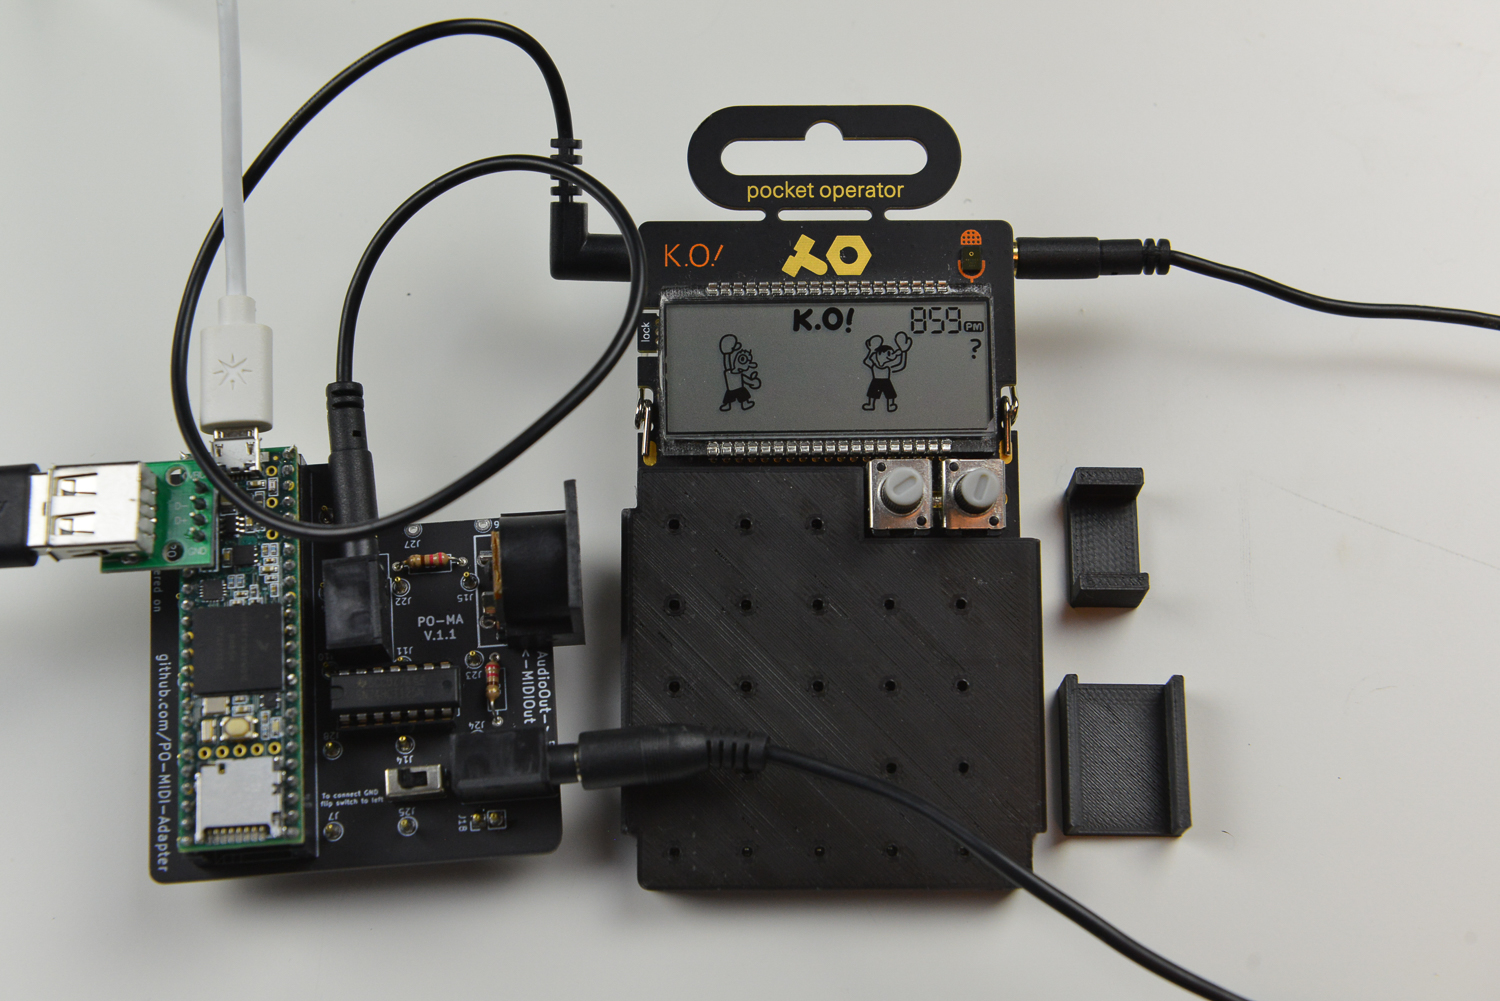
To removed the board, undo the 2 side holders and removed the adapter form the cover while the Teensy is still powered on. Failure to do so might cause accidental triggers of buttons on the PO which could delete pattern/sounds...
Please remove the adapter before the PO goes to sleep mode.
All 23 buttons on the PO are triggered by MIDI NOTES with the adapter attached. MIDI CC, MIDI PC won't work
Available from firmware version 2.4.x (hardware rev v2). It is possible to use the web app to configure the device. You must use a recent version of a chromium browser (Chrome, Edge...) for it to work. The guide below here can still be used for references. The web app provides a much more intuitive interface to set up the adapter. The parameters will be saved to the device's memory and you do not need microSD card.
You can either use the web app, which saves to the adapter's onboard memory or use a config file copied to the microSD card. You cannot use both at the same time. If the microSD card is inserted, the file will be used regardless of the onboard memory parameters
To change MIDI assignment, we need to modify config.cfg in the microSD card. The file is already in the root directory of the card. You can edit the file on any text editor on a computer.Please check the which version of the board you have before downloading. The version is marked on the PCB board
You will need to power cycle the adapter to load any new edits made to the config.cfg file in the future.
Lines 1-23 are for midi notes assignment. These MIDI notes are used to trigger the buttons on the Pocket Operator Value of the right hand side of '=' sign should be between 1-127 as per MIDI convention
The relationship of the midi notes are as follows:
- midi_note_1 -> PO_BUTTON_1
- midi_note_2 -> PO_BUTTON_2
- midi_note_3 -> PO_BUTTON_3
- midi_note_4 -> PO_BUTTON_4
- midi_note_5 -> PO_BUTTON_5
- midi_note_6 -> PO_BUTTON_6
- midi_note_7 -> PO_BUTTON_7
- midi_note_8 -> PO_BUTTON_8
- midi_note_9 -> PO_BUTTON_9
- midi_note_10 -> PO_BUTTON_10
- midi_note_11 -> PO_BUTTON_11
- midi_note_12 -> PO_BUTTON_12
- midi_note_13 -> PO_BUTTON_13
- midi_note_14 -> PO_BUTTON_14
- midi_note_15 -> PO_BUTTON_15
- midi_note_16 -> PO_BUTTON_16
- midi_note_sound -> PO_BUTTON_SOUND
- midi_note_pattern -> PO_BUTTON_PATTERN
- midi_note_bpm -> PO_BUTTON_BPM
- midi_note_special -> PO_BUTTON_SPECIAL
- midi_note_fx -> PO_BUTTON_FX
- midi_note_play -> PO_BUTTON_PLAY
- midi_note_write -> PO_BUTTON_WRITE
Line 23-31 are some general MIDI parameters, they are not MIDI notes
- midi_cc_knob_1...16 -> Used by the internal synth engine (V1 adapter only except midi_cc_knob_9, see advanced usage).
- po_midi_channel= -> 1-16, Midi channel for the pocket operator control (V1 adapter only, see advanced usage)
- synth_midi_channel= -> 1-16, Midi channel for the internal synth engine (V1 adapter only, see advanced usage )
- disable_transport= -> 0 or 1, if set to 0, pressing play on the midi controller will start the loop on the Pocket Operator.
- volca_fm_velocity= -> 0 or 1, if set to 1, enable note velocity for volca FM (See advanced usage)
- volca_fm_midi_ch_1= -> 1-16 (See advanced usage)
- volca_fm_midi_ch_2= -> 1-16 (See advanced usage)
- sync_out_enabled= -> 0 or 1, if set to 1, translate midi clock to sync out and outputs it thru the 3.5mm jack
- synth_enabled= -> 0 or 1, if set to 1, enable the internal synth engine (V1 adapter only, see advanced usage)
- midi_ppqn=24 -> don't change
Line 26 changes the mode of operation of the adapter .There are two modes of operation, The modes can be changed by po_cc_control.
mode 0 : Controller with at least 23 pads/keys (recommended)
mode 1 : controller with 16 pads/keys and at least 4 knob.
-
When
po_cc_controlis 0, all 23 buttons on the PO are assigned to separate midi notes. See below for more specification on midi assignment. This is probably the mode you want to use and it is the mode used by default -
When
po_cc_controlis 1, the value of midi_cc_knob_9 changes the behaviour of the midi keys/pads.
1. midi_cc_knob_9 is 0  -> The 16 midi pads/keys are assigned to the 1-16 buttons on the PO
2. midi_cc_knob_9 is 1 -> The 16 midi pads/keys are assigned to the play,write,sound,bpm,pattern,fx,special
3. midi_cc_knob_9 is 2 -> The FX button is pressed, The 16 midi pads/keys are assigned to 1-16 buttons
4. midi_cc_knob_9 is 3 -> The special(top right) buttons is pressed. the 16 midi pads/keys are assigned to 1-16 buttons
5. midi_cc_knob_9 is 4 -> The write buttons is pressed. 16 midi pads/keys are assigned to 1-16 buttons. Switching to another mode from        this mode will pressed the write button again, turning the light off.

In mode 1, sound pattern and volume are also controlled by MIDI CC
1. midi_cc_knob_10 -> Sounds 1-16
2. midi_cc_knob_11 -> Pattern 1-16
3. midi_cc_knob_12 -> Volume 1-16
Line 32-53 are used for the looper function on PO-33. Please refer to the advanced guide.
For example, if you want a key/pad on your midi controller the to trigger Button 1 on the PO, you would to the following
- In your MIDI controller config software , set the key/pad to play a MIDI note on a MIDI channel. For this example let’s say MIDI note : 70 (A#4) and MIDI channel 3. ** MIDI CC or MIDI PC will not work**
- In config.cfg, set midi_note_1=70
- In config.cfg, set po_midi_channel=3
- Save the modified config.cfg file to the microSD card
- Insert the SD card in to the Teensy and power on
- Then you just have to repeat the same steps for the rest of the pads
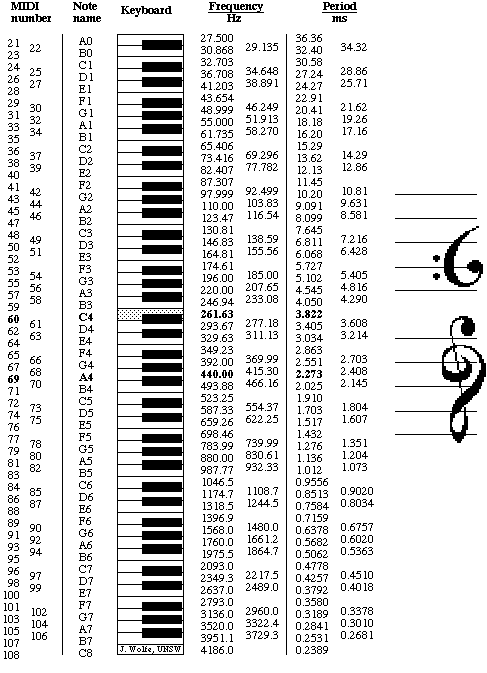
For midi notes to music notes conversion, you can use the following diagram
The adapter can acts simultaneously as a MIDI device and a MIDI host via the 2 USB ports.
By default, signals from both USB ports and MIDI IN (V2 only) are merged together and sent to 5-DIN Midi output
You may plug multiple controller into the USB-host port if you used an externally powered usb hub. Note that the USB-host port can only provide around 100-150mA of current. If you're controller has a lot of LEDs or a LCD screen, please uses an external power source as the MIDI adapter will not be able to power it and might stop working.
By default, MIDI transport messages are filtered out and not send to the MIDI output. However you can change the behavior by changing the value of disable_transport to 0 either in po_midi_adapter.ino or in config.cfg
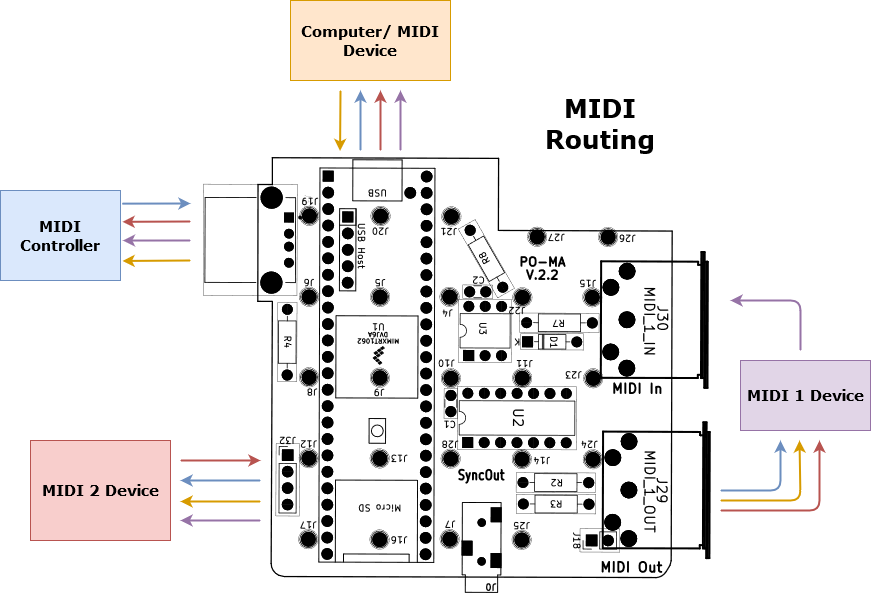
By chaining devices together using MIDI DIN, you can control multiple Pocket Operators with one MIDI devices.

With the 4 pin header, you can attach another adapter with 3 wires. The second adapter will be powered by the wires and will not need any USB connection. In the below example. The left adapter is the main and the right one secondary

