

Express is a library we'll use to make web servers for our front-end applications to query our databases.
Fork&Clonecdinto the directorytouchaserver.jsfilecode .to open in VSCode
- Review the HTTP request / response flow
- Explain the role of a web server in a full-stack application
- Write a route handler for a GET request with Express
- Pass information with query and route parameters
- Respond to a GET request with data from a database
You may have seen http or https while browsing the web before. What you may not know is that HTTP is the structure of messages that all information travels in over the web.
When you visit a webpage in your browser, you type in a URL like https://wizardingworld.com/. What's technically happening here, is you're making an HTTP request. The browser sends a message to the Harry Potter web server that speaks HTTP: "Hey, can I have the contents for the domain wizardingworld.com, at the path /news?
The web server sends an HTTP response back with the HTML content of that website. Magic!
This HTTP request and response cycle is at the heart of the web.

Express is a JavaScript library to set up your own web server, which listens for different kinds of HTTP requests, and serves the right response.
We'll use Express solely as a JSON API server. Our database might contain information about quidditch matches. Our React-powered front-end application will make axios calls to our server to, say, get all the matches at /api/quidditch-matches.json.
In working on the web server, it is your job to write code to listen for a /api/quidditch-matches.json HTTP request, query information from the database, and then send it back to the front-end in an HTTP response.
To use Express, you'll add the package on a project by project basis with npm:
npm install express
To use Express, we require() the package in our server.js file, create a new Express application object, and finally start the application "listening" on a specific port. Let's build this out together:
const express = require('express')
const PORT = process.env.PORT || 3001

const app = express()

app.listen(PORT, () => {
  console.log(`Express server listening on port ${PORT}`)
})
Our server won't do anything just yet, this is just boilerplate to use Express.

In Express, you define a route in a server.js file. A route is a path the user makes an HTTP request for, such as GET /, and a handler function that takes care of that request. Like this...
app.get('/', (req, res) => {
  res.send("You're a wizard, Harry!")
})
Whenever an HTTP request to http://localhost:3001/ is made, the handler function is called. This function has access to two variables: req and res which represent the HTTP request (any information the user sent along to us) and the HTTP response (any information the server bounces back).
You might end up doing a lot in these route handler functions. One thing they have to do is send an HTTP response back, which we're doing here with res().
When a user visits http://localhost:3001/ in the browser, they'll see "You're a wizard, Harry!" displayed on the page. Note that if they go to http://localhost:3001/news, we see an error message "Cannot GET /news" because that's a different path that we haven't defined a route for.
A web server is a long-running process, which you could just run with node server.js. This would spin up your server once. However, since you'll be editing the server files and continuously testing it, you would have to stop the node server.js process and restart it after every change. Ain't nobody got time for that!

Let's use a cool package called nodemon instead. We add this on a project by project basis:
npm install nodemon --save-dev
Then modify the scripts section in the package.json file to add a start and dev script. This allows us to run npm start to run a one time spin up of our server or npm run dev to run our server with nodemon:
"scripts": {
  "start": "node server.js",
  "dev": "nodemon server.js"
}
Say it with me: Magic!

In our Express server in server.js, let's define the following routes:
 - GET /                  Response content: "Welcome to my webpage"
 - GET /favorite-food     Response content: Your favorite food
 - GET /favorite-movie    Response content: Your favorite movie
 - GET /contact           Response content: Your preferred contact info
 - GET /about-me          Response content: A JSON object with properties about yourself
 - GET /movies            Response content: A JSON object that contains an array of 3 objects, each one containing a movie's name, release date, and durationInMinutes
If you consider two URLs:
- wizardingworld.com/article/top-ten-wizards-all-time
- wizardingworld.com/article/draco-malfoy-villain-or-victim
You could safely assume that both of these URLs are articles, just with different URL slugs: top-ten-wizards-all-time and draco-malfoy-villain-or-victim. By convention, if a part of the URL contains two words, we join them with -. This is known as "sluggifying".
In Express, we can create dynamic endpoints by using the in built in request object.
When writing an Express route, you can access the dynamic parts of the path by declaring them as route parameters:
app.get('/article/:slug', (req, res) => {
  console.log(req.params)
  // { slug: 'ramen' }
})
In the path definition, add a colon before a meaningful name for the parameter. You'll have access to the dynamic value inside of the req.params object.
Example:
app.get('/message/:id', (request, response) => {
  console.log(`Getting a message with the id of ${request.params.id}`)
  response.send({ msg: `Message with an id of ${request.params.id} found` })
})
In our example above, we are defining a /message endpoint, however, we also add in /:id. This is what's known as a request parameter. This parameter dynamically changes whenever some type of information is passed in. We access this parameter by using request.params.{yourParamName} inside of our function.
You can name your parameter anything, but it should always be relevant to the kind of information that you are looking for.
Example:
app.get('/find', (request, response) => {
  console.log(
    `Finding someone with a name of ${request.query.myName} and an age of ${request.query.myAge}`
  )
  response.send({
    msg: `${request.query.myName} is ${request.query.myAge} years old.`
  })
})
In this example we are defining a /find endpoint. This endpoint utilizes the request object and gets information from the query object that resides inside of it.
Query's function in different way from params because we dont set any placeholders ahead of time. Instead this information is given when constructing the endpoint:
localhost:3001/find?myName=Bob&myAge=23
We start a query with the ? operator and set a variable that will hold some type of value. If any additional information is needed we use the & operator to append extra variables and values.

-
Create a
GETendpoint/dogsand send a string with your favorite dog breed. -
Create a
GETendpoint/cats/:catNameand send the cat name you provide back in an object. -
Create a
POSTendpoint/townsand send your hometown back in an object. -
Create a
PUTendpoint/profile/update/:username, and send back a string that reads:User profile with the username of {Whatever username you chose} was updated. -
Create a
DELETEendpoint/tacoswith the query parameters oftypeandtacoId, and send back an object withI deleted the {your taco type} with an id of {your taco id}.
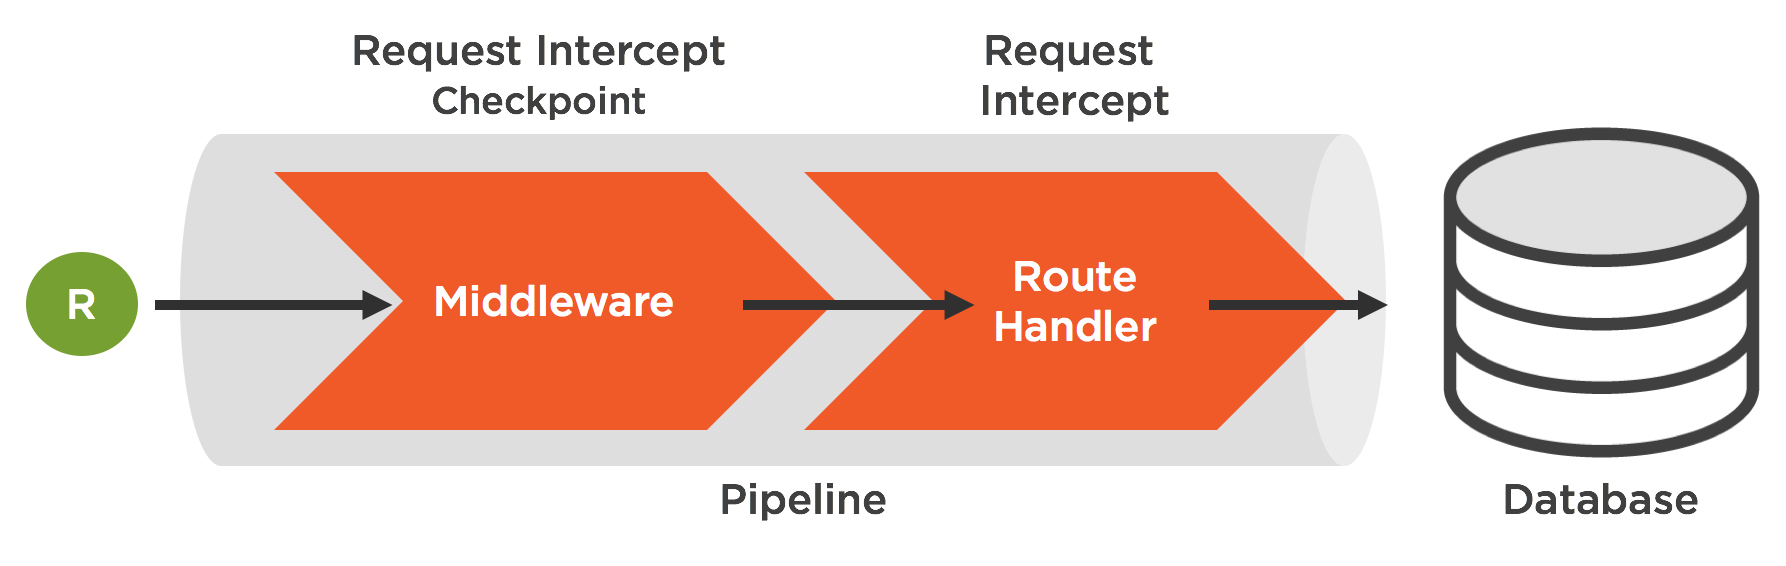
Let's learn how to use functions called middleware. Middleware is a core concept of Express and allow us great flexibility in building and structuring our servers. Middleware helps us handle different conditions during the request/response lifecycle and assists us with making our code more modular.
const express = require('express')

const app = express()
const PORT = process.env.PORT || 3001
// Your Code Here

// Your Code Ends Here
app.listen(PORT, () => {
  console.log(`App listening on port: ${PORT}`)
})Middleware can be described as a function that run's in the middle of a request or before. From the Express documentation:
Middleware functions are functions that have access to the request object (req), the response object (res), and the
nextmiddleware function in the application’s request-response cycle. The next middleware function is commonly denoted by a variable named next.Middleware functions can perform the following tasks:
- Execute any code.
- Make changes to the request and the response objects.
- End the request-response cycle.
- Call the next middleware function in the stack.

Let's install a couple of depedencies that we will use as middleware.
npm install cors - cors
Once the dependencies finish installing, we'll need to
requirethem in ourapp.js.
const express = require('express')
const cors = require('cors')


const app = express()
const PORT = process.env.PORT || 3001
// Your Code Here

// Your Code Ends Here
app.listen(PORT, () => {
  console.log(`App listening on port: ${PORT}`)
})
Now that we have access to this packages we can utilize it in our express app.
Luckily Express makes it super easy for us to incorporate middleware.
Express provides us with a .use() function that allows us to incorporate 3rd party packages.
Add the following to your app.js in the your code goes here section.
app.use(cors())
// the following middleware comes out of the box with express...
app.use(express.json())
app.use(express.urlencoded({ extended: false }))
By invoking the .use() method, we are telling our Express app to use these packages.
The cors package enables cross origin resource sharing for our app.
Feel free to look this up on your own time.
The json method allows us to send json information to our server and the urlEncoded method allows us to send encoded forms to our server.
We've successfully implemented 3rd party middleware with our app!
Below our 3rd party middleware, create a GET route for a /middleware endpoint:
app.get('/middleware')After the url, create a function and pass in 3 parameters, request, response and next.
app.get('/middleware', (request, response, next) => {})next is a function that tells express to call or invoke the next function.
Inside of this function let's add a console.log and log this is a middleware function and invoke the next function.
app.get('/middleware', (request, response, next) => {
  console.log('this is middleware')
  next()
})
Now let's add the final function in our route. In this function, pass in the request and response parameters and we'll send back a reponse with the string request completed.
app.get(
  '/middleware',
  (request, response, next) => {
    console.log('this is middleware')
    next()
  },
  (req, res) => {
    res.send('response completed')
  }
)
Test this endpoint with ThunderClient and you'll see our console.log in the terminal and a response returned to your HTTP client.
You've just built your own middleware!
We were introduced to Express, learned about HTTP requests, and how to set up basic Express server boilerplate. We also got some practice in with setting up routes. All in all, not too bad of a lesson!
