In this project, you are going to take the knowledge that you just gained to build a data-driven application with Flask. In this, you will implement a calendaring application with
- Appointments
- A Google Calendar-like user interface (but no client-side fancy)
- A stretch goal of recurring appointments
This is going to combine Flask, Psycopg2, WTForms, and Jinja2 into one project. YAY!
In this project, you will be encouraged to refer to external documentation for some aspects of the project. This is part of the practice of programming: reading documentation. Luckily, Python projects tend to have thorough documentation, not like some of the stuff you saw in Node.js-land. For those references, there will also be code blocks that show you the implementation should you find the documentation inscrutable. However, you are highly encouraged to try to figure it out, first, because that's what you will do once you become a full-time software engineer.
Create a new project directory called calendar_this. Change your working
directory into calendar_this and run the following command to initialize your
Python virtual environment and install needed dependencies all in one command.
You'll use Python 3.9.6 because that version is supported on both macOS and
Windows. It will install Flask, Psycopg2, Flask-WTF, and Flask-Login. Installing
Flask also installs Jinja2 for you. Installing Flask-WTF also installs WTForms
for you. Flask-Login installs ... just Flask-Login. :-D Then, python-dotenv
allows Flask to load your .env and .flaskenv.
pipenv install Flask psycopg2-binary Flask-WTF python-dotenv \
       --python 3.9.6
Once it installs, activate the virtual environment.
pipenv shellIf you don't want Visual Studio Code to complain to you about linters, now type
pipenv install --dev pylintNow, you're ready to do some coding! Open up Visual Studio for the project directory.
Getting Flask running following best practices requires you to complete some steps.
- Create a
.gitignorefile for a Python project - Create a directory that will contain your application's code
- Create a file for your routes and a Blueprint in it to hold the routes for the application
- Create an
__init__.pyfile in your application's code directory that holds the declaration of your Flask application - Create a top-level module that will load the application code for you and give it to Flask to run
- Create a
.envand.flaskenvfile to contain the settings for the Flask application
Once you have that set up, you should be able to run the app and see it respond to your application!
There are lots of things that Python projects can produce that you do not want
in your application. GitHub maintains an updated repository filled with
.gitignore files that you can use for almost any kind of project that you
could create. They have one for Python projects. You can use that to create a
.gitignore for you.
Of course, you could go to GitHub, find the file, click on it, copy the
contents, create a .gitignore file for your project, and paste the contents
into it. But, as a developer, that should make you roll your eyes. Clicking!
Copying! What is that primitive behavior? Instead, you can just do it on the
command line like this.
curl https://raw.githubusercontent.com/github/gitignore/master/Python.gitignore > .gitignoreWhich uses curl, the command line tool to download content from the Internet,
and redirect the content it gets into a .gitignore file. So easy!
You should keep that command in your "list of good code snippets to have" because it's a good code snippet to have.
Since you have a good .gitignore file, you can initialize your directory as
a Git repository. You should do this so that you can add and commit your code
after every step, in case you want to rollback a change that broke something.
# Initialize the Git repository
git init

# Look and see what will be added. It should only
# be .gitignore and the Pipfiles
git status

# Add and commit
git add .
git commit -m "Add new project files Pipfile and Pipfile.lock"Now, create your code to get the application up and running. First up, create
the application's code directory. Some developers name this app while others
name it src. You choose. These instructions go with app.
Inside the app directory, create a file named routes.py. In that file,
import the Blueprint from class from the flask package. Please refer to the
article Routing Blueprints In Flask to see how to import that.
Now, create an instance of the Blueprint class with the name "main" as the
first argument, __name__ as the second, and the top-level route "/" as the
third. Store that into a variable named bp. Please refer to the article
Routing Blueprints In Flask to see how to create a Blueprint object.
Create a new route that shows the "main" page. Do that by defining a function named "main" that takes no arguments and returns the string "Calendar working". Decorate that with the following code.
@bp.route("/")Remember that when you have a Blueprint, you use the variable name that contains the Blueprint object to declare your routes.
Now, create an __init__.py that creates the Flask app, gets the secret key
from the environment, and registers the Blueprint. That code should look like
this.
from app import routes
from flask import Flask
import os

app = Flask(__name__)
app.config.update({'SECRET_KEY': os.environ.get('SECRET_KEY')})
app.register_blueprint(routes.bp)
In the article, you were encouraged to create a Config class in a config
module so that you could use app.config.from_object. This is an alternate way
of doing it, the app.config.update method takes a dictionary and uses it in
much the same way that app.config.from_object iterates over the attributes of
the object and sets the configuration from that.
Flask supports two environment files, .flaskenv and .env. You should put
the settings in .flaskenv that won't change between development and production
environments. This includes settings like FLASK_APP, the entry point for your
application.
You should put development settings in your .env because that one won't get
checked in to source control. These should include FLASK_ENV and SECRET_KEY.
In the project root, create a .flaskenv file and put the FLASK_APP in there.
FLASK_APP=appIn the project root, create a .env file and put the FLASK_ENV and
SECRET_KEY settings. Replace the "«some random bytes»" in the following
content with some secret value.
FLASK_ENV=development
SECRET_KEY=«some random bytes»
You should now be able to start your Flask application with the following command.
flask runOpen up a Web browser to http://localhost:5000 and you should see "Calendar working".
Inside the app directory, create a templates directory. Inside there, create
an HTML file named "main.html". Inside that file, create a Jinja2 template that
doesn't have any dynamic stuff, just a normal HTML file with an html, head,
title, and body. In the body, put an h1 element with the content "Calendar
working".
Now, change the main method in your routes.py file to render that HTML file.
You don't need to pass any data into it. Please refer to Jinja Templates on
how to import and use the render_template function.
You should now refresh your browser and see the Calendar working rendering there. When it works, add and commit your changes to your local GitHub repository.
You've done this often, so here are the specs for you to create your development database.
| Value | |
|---|---|
| User name | calendar_this |
| Database name | calendar_this_dev |
| Password | Ku9rSyXD |
BE SURE TO LOG INTO THE CALENDAR_THIS_DEV DATABASE AS THE CALENDAR_THIS USER BEFORE YOU CREATE ANY TABLES. If you skip this step, you'll be unable to access the tables later on in the project
Insider there, create a table named "appointments" with the following specification.
| Column name | Column type | Constraints |
|---|---|---|
| id | SERIAL | Primary Key |
| name | VARCHAR(200) | Not Null |
| start_datetime | TIMESTAMP | Not Null |
| end_datetime | TIMESTAMP | Not Null |
| description | TEXT | Not Null |
| private | BOOLEAN | Not Null |
Go ahead and put one record in there so that you can see it in the browser as you're developing. Wherever you see "«DATE»" in the following SQL, please insert the current date in "YYYY-MM-DD" format.
INSERT INTO appointments (name, start_datetime, end_datetime, description, private)
VALUES
('My appointment', '«DATE» 14:00:00', '«DATE» 15:00:00',
 'An appointment for me', false);
Now, put the connection URL into your .env file so that it will be usable by
your application. This goes in .env because you don't want this to get into
source control, nor deployed to a production environment where a different
database will likely exist.
DB_USER=calendar_this
DB_PASS=Ku9rSyXD
DB_NAME=calendar_this_dev
DB_HOST=localhost
Because Flask reads this file for you, it should now be accessible through the
os.environ.get method.
You now have a place from which to get data and a place to put data.
Now, it's time to get that appointment out of the database and show the data on
the Web page. In your app.routes module (that means app/routes.py), import
the os module at the top of your file.
After the creation of your Blueprint for the routes, put a dictionary named
CONNECTION_PARAMETERS like you saw in Using Psycopg. You want to read the
values from the environment variables in the .env file that you added.
CONNECTION_PARAMETERS = {
    "user": os.environ.get("DB_USER"),
    "password": os.environ.get("DB_PASS"),
    "dbname": os.environ.get("DB_NAME"),
    "host": os.environ.get("DB_HOST"),
}
Using CONNECTION_PARAMETERS, in your main method, create a connection,
create a cursor, execute the SQL to select all of the records from the
appointments table, fetch all of those appointments, and pass them as data
into the render_template function. Here's what it will look like when you get
done. Refer to Using Psycopg for the syntax to do this.
@bp.route("/")
def main():
    # Create a psycopg2 connection with the connection parameters
        # Create a cursor from the connection
            # Execute "SELECT id, name, start_datetime, end_datetime
            #          FROM appointments
            #          ORDER BY start_datetime;"
            # Fetch all of the records
            return render_template("main.html", rows=rows)
Recall that the value that comes from fetching all of the rows from Psycopg2 is a tuple with the entries in it. That means the result will be
(1, 'My appointment', datetime.datetime(year, month, day, 14, 0, 0)), datetime.datetime(year, month, day, 15, 0, 0))Those last two entries are datetime objects from the datetime built-in
package. To format dates, you can use the strftime method on the datetime
object. For example, to show just the time, you could do something like this.
d.strftime("%H:%M")The "%H" is a format code for the hour, and the "%M" is the format code for the
minute. (For a full list of format codes, see strftime() and strptime()
Format Codes in the Python documentation.) Make sure to use strftime in
your Jinja template to make the times human readable.
In the main.html file, use the rows variable that you just passed in to
create a table that shows each appointment's name, start_date, and end_date.
Refer to Jinja Templates for the syntax on how to write a loop. The table
could look like this.
<table>
  <thead>
    <tr>
      <th>Name</th>
      <th>Start</th>
      <th>End</th>
    </tr>
  </thead>
  <tbody>
    <!-- loop here to create rows -->
    <!-- use strftime to format date objects -->
    <!-- loop here to create rows -->
  </tbody>
</table>
Once you have that done, you should now see a single row (assuming you inserted
only one record into the appointments table).

Now, you'll build a form for people to complete to create new appointments. Then, you'll write a handler to accept the form. To do this, you'll primarily use Flask-WTF.
Create a new file in your app directory named forms.py. In there, you'll
create your WTF form class.
The following tables lists the data base column name, its type, the name of the attribute that you'll use on the form class, and what kind of Basic or Convenience Field it should use from WTForms.
| Column name | Data type | Attribute name | Field type |
|---|---|---|---|
| name | string | name | StringField |
| start_datetime (date part) | date | start_date | DateField |
| start_datetime (time part) | time | start_time | TimeField |
| end_datetime (date part) | date | end_date | DateField |
| end_datetime (time part) | time | end_time | TimeField |
| description | string | description | TextAreaField |
| private | Boolean | private | BooleanField |
You'll also want validation for these fields, the DataRequired being the
obvious one.
In addition to those attributes from the table, you'll want to create a mapping
on your form class for a SubmitField. Don't forget that. Otherwise, you won't
have a button to submit the form!
Now, note that the the start_datetime and end_datetime columns in the table
have two fields to handle one value. It's not that Python can't handle a
combined date/time. It's HTML. There is no such thing as a "datetime" input.
There was going to be one, but it got dropped from the specification because all
the browser makers were like, "Hey! Why make one field when everybody can just
use two?" So, dropped it got.
Using those field names, field types, and the need for validation, build a form
class named AppointmentForm for use by your route and view. Refer to Serving
HTML From Flask and Handling POSTs for how to build the form class. (Don't
forget to inherit from FlaskForm.) You should end up with an AppointmentForm
class with eight attributes on it.
Note: Do not put DataRequired on the BooleanField. If you do, that
requires the user to always check the box. You don't want that behavior.
When you write your form class, you will need to import a lot of classes. It might end up looking like this.
from wtforms.fields import BooleanField, DateField, StringField, SubmitField, TextAreaField, TimeFieldThat's a long line. If you have pycodestyle installed as your linter, it will
complain that the line is too long. A way to fix that is to use parentheses to
group your imports like this.
from wtforms.fields import (
    BooleanField, DateField, StringField, SubmitField, TextAreaField, TimeField
)
That way, you can end up with multiple lines of imports, if you need to.
Once you have the form class created, import it into your app.routes module,
create an instance of it as the first line in your main function, and pass it
as a parameter to your template for use.
@bp.route("/")
def main():
    form = AppointmentForm()
    # Create a psycopg2 connection with the connection parameters
        # Create a cursor from the connection
            # Execute "SELECT id, name, start_datetime, end_datetime FROM appointments;"
            # Fetch all of the records
            return render_template("main.html", rows=rows, form=form)
            #                                                  ↑
            #                                         Added this form, too
Now that you have the form passed to the view, use the functionality provided
by WTForms to create the form. Place the form element before your table
element that you created in the last section, and have it post to "/". Please
refer to Serving HTML From Flask for how to render the form from the
AppointmentForm that you passed into the template.
<form method="post" action="/">
  <!-- use your form variable here -->
  <!-- to make your form           -->
</form>
<table>
  <thead>
    <tr>
      <th>Name</th>
      <th>Start</th>
      <th>End</th>
<!-- the rest of the HTML -->
Once you have that done and rendered, it'll look something like this.
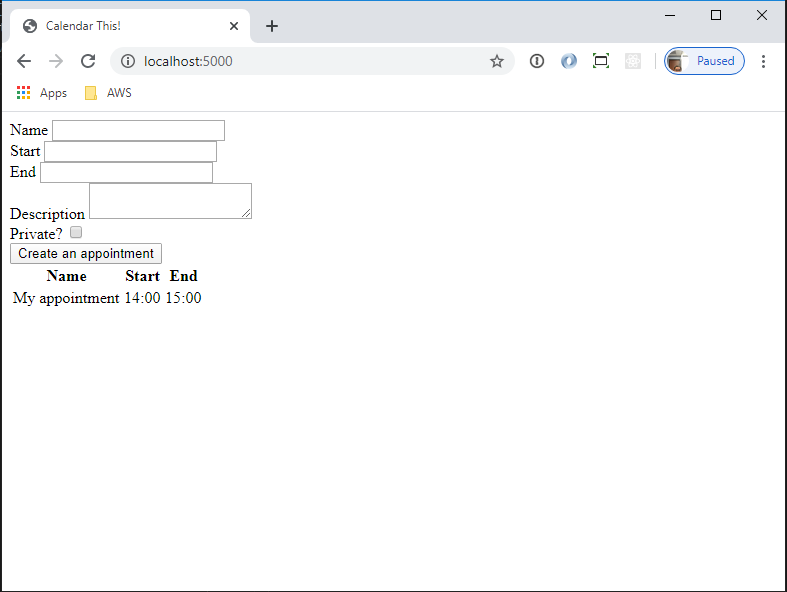
Now that you have the form appearing, you need to handle it in the post.
Change the route registration from @bp.route("/") to handle both GETs and
POSTs. Please refer to Handling POSTs for how to specify that.
Use the validate_on_submit method to check if the form is valid and, if it is,
then create a new record in the database by issuing an INSERT statement. Once
that completes, redirect the browser to "/". Please refer to Using Psycopg to
see how to use a parameterized INSERT statement. Please refer to Handling
POSTs to recall how to redirect.
Because you haven't had to deal with datetime values a lot, so far, here's the
parameter dictionary for you that pulls the data from the AppointmentForm
object that you can use in your parameterized INSERT statement. It combines
the date from the start_date attribute (type date) and the start_time
(type time) attribute into a single datetime Python object.
# Put this import at the top of app.route
from datetime import datetime

# Use this code snippet in running your INSERT statement
# You must have named the attributes on your AppointmentForm
# class what was recommended in the table for this to work.
params = {
    'name': form.name.data,
    'start_datetime': datetime.combine(form.start_date.data, form.start_time.data),
    'end_datetime': datetime.combine(form.end_date.data, form.end_time.data),
    'description': form.description.data,
    'private': form.private.data
}
Altogether, it'll look like this.
@bp.route("/")
def main():
    form = AppointmentForm()
    if form.validate_on_submit():
        # Create a psycopg2 connection with the connection parameters
            # Create a cursor from the connection
                # Execute a parameterized INSERT statement with the
                #   params dictionary from above
                # Redirect to "/"
    # Create a psycopg2 connection with the connection parameters
        # Create a cursor from the connection
            # Execute "SELECT id, name, start_datetime, end_datetime FROM appointments;"
            # Fetch all of the records
            return render_template("main.html", rows=rows, form=form)
Here's the link to the Psycopg2 documentation for Passing parameters to SQL queries in case you need another point of view.
Once you get that done, you should be able to add a new appointment via your form and see it in the list.
It wouldn't make any sense for the end_datetime to be less than the
start_datetime. In this section, you will write a custom validator for the
AppointmentForm. Then, you will show the error, if it exists.
You're already using DataRequired as a validator for values in the form
fields. WTForms allows you to write custom validators for your fields, either as
a class (for reusability) or as a one-off function for just one field. This
section will walk you through doing the latter. Try to work through the
instructions. If you get stuck, the actual code follows the instructions.
In your app.forms module, import the datetime object from the datetime
module. like you did in the app.routes module. You're going to need it to
combine date and time objects. The datetime object in Python supports the
comparison operators <, >, <= and >=, so once you combine the values,
it's a simple if statement with a <.
Also, you'll need to import the ValidationError class from
wtforms.validators package. Just add it to the existing import.
In your AppointmentForm, create a new method named validate_end_date that
takes two parameters, form and field. This is a one-off validator for the
end_date attribute. You can write a validate_«attribute name» method for
any and all of the attributes in your form classes and WTForms will run the
validations when you call validate_on_submit.
In the validate_end_date method, use the combine method in the same way that
you did for the params object in the previous section, storing the combined
start_date and start_time values into a variable named start, and the
combined end_date and end_time values into a variable named end.
Use an if statement to compare that start is greater than or equal to the
end value. If it is, raise a ValidationError with the error message "End
date/time must come after start date/time". Please refer to the Custom
validators section of Validators in the WTForms documentation.
If you just can't figure those instructions out, here's the code for you.
(Note: The import of ValidationError is not shown. Please do that on
your own.)
def validate_end_date(form, field):
    start = datetime.combine(form.start_date.data, form.start_time.data)
    end = datetime.combine(field.data, form.end_time.data)
    if start >= end:
        msg = "End date/time must come after start date/time"
        raise ValidationError(msg)
You can test this out by going to the form in the browser and filling it out with a start date/time greater than the end date/time. When you submit it, it should just show you the form, again, with all of the previous values and no new value in the table.
When a form field fails validation, the associated attribute in the instance of
the form class has an error added to a list that is in the errors attribute
of the field. For example, if the end_date attribute fails the validation that
you just wrote, then there will be an entry in end_date.errors. You can loop
over that list to show errors in your Web page.
Now that your form can fail with a start date that is greater than or equal to
the end date, it's only polite to show the person filling it out any errors that
they may have inadvertently entered. In the main.html file, replace the
rendering of the form.end_date with this code snippet. Don't copy and paste
it. Type it and talk about it with your pair so that there is a mutual
understanding gained.
<div>
  {{ form.end_date.label }} {{ form.end_date }}

  {% if form.end_date.errors %}
    <ul class="errors">
      {% for error in form.end_date.errors %}
        <li>{{ error }}</li>
        {% endfor %}
    </ul>
  {% endif %}
</div>Now, add to the previous validate_end_date custom validator to make sure the
the start date and end date values (not the times) are the same day. This will
make the rendering of your calendar day much easier.
Now, you will use routing to figure out what day to show and constrain your
SELECT query to that day's appointments.
You're going to change the routes, now, in the following way:
- The
mainmethod which handles "/" will redirect to a new path/<year>/<month>/<day>where year, month, and day are for the current date - A new method named
dailywill show the appointments for that day
To do this, add the daily method to your app.routes. It should have three
parameters: year, month, and day. The route should reflect that using
int placeholders. Please refer to the section Routes with wildcards in
Routing In Flask to see how to do that. Once you have that declared, move all
of the code from main to the new daily method. Make sure the route can
handle both POST and GET requests.
In the main method, you need to get the current date. Luckily, you've already
imported the datetime object into the file which has a now method. Use the
now method to return the current date/time and store it in a variable. The
datetime object in that variable has three attributes that you need: year,
month, and day.
Now, you could use those year, month, and day values to just build a string
and redirect to that. However, Flask has a built-in method named url_for that
will build the path for you. The url_for method takes the following
parameters:
- The name of the method that will handle the route. If you're in a Blueprint,
prepend the name of the method with a ".". For this case, you want to reroute
to the "daily" method in the same Blueprint, so the first argument for
url_forwill be".daily". - A series of keyword arguments that will provide values for any of the
placeholders in the route. In this case, the route has placeholders for
"year", "month", and "day". Because of that, you would provide those as
keyword arguments
year=value,month=value, andday=value.
Try referring to the documentation for the url_for function to figure out
how to call it. If you get stuck, a completed version of the code follows.
The main method's route should only handle GET requests, now, so remove the
methods argument from its route.
Your main method should look like this.
# At the top of the file, import the url_for function
from flask import Blueprint, redirect, render_template, url_for

# The new main route
@bp.route("/")
def main():
    d = datetime.now()
return redirect(url_for(".daily", year=d.year, month=d.month, day=d.day))Because you moved all of the form-handling logic to the daily method, you
now need to update the action of the form tag to point to the correct
path. It's currently set to "/". Change that to it's set to "". This will
cause the form to submit to the same path the form resides on.
Now that you have the year, month, and day getting passed into the daily
method, it's time to put those values to use. Before your SELECT statement in
the daily method, you need to put those three integers together to make a
datetime object. Then, you need to calculate the next day so that you can use
it in your SQL statement. Here are the steps you will take to determine those
values:
- You're already importing from the
datetimemodule. Addtimedeltato the list of things you're importing from it. - Construct a
datetimeobject from theyear,month, anddayvalues. If you're using the Python extension for Visual Studio Code, typedatetime(to see what comes up and try to figure it out from there. If that doesn't help, try looking at the documentation fordatetimeto figure it out. Set that value to the variableday. - Create a
timedeltaobject that represents one day. Refer to the Examples of usage:timedeltato see how to construct atimedeltathat represents "1 day". Create a new variable namednext_dayand set it equal to the sum ofdayand yourtimedeltaobject.
If those directions weren't enough for you to figure out what to do to create
the day and next_day values, please do an Internet search for "python
datetime add one day". There will be many examples of date math for you to use.
Once you have those values, change your SQL statement to read like the
following. Then, pass in the parameter values for day and next_day like you
did earlier for the INSERT statement. Please refer to Using Psycopg to see
how to use a parameterized SQL statement
SELECT id, name, start_datetime, end_datetime
FROM appointments
WHERE start_datetime BETWEEN %(day)s AND %(next_day)s
ORDER BY start_datetime
Now, when you refresh the page, you should see only the appointments for the day.
That's a great job! You have a working appointment application using full-stack Python! You can change the days by typing specific dates into the URL. You did really well.
If you got to this point and have more time, here are some stretch goals for you. Choose any one you want to do in any order. They're orthogonal, which means they don't rely on one another. If you finish one and still have time, do more!
Add a way to change days, be it through links or a form. If you choose to use a form with month, day, and year dropdowns, add a little JavaScript to the page to handle the submit event of the form, prevent the submission, and then redirect to the appropriate URL based on the values of the drop downs.
You could also use an <input type="date"> to do this which will render the
browser's built-in calendar control. You'd then use JavaScript the same way to
read its value and change the location based on the value.
You have the appointments coming to you in a list in order of their start date.
Use your programming ability to get rid of the table in the main.html
template and replace it with something like Google's daily layout of
appointments. Don't worry about overlapping appointments. If you have some,
delete them from your database to make this easier on you.

This type task is something that a lot of full-stack developers get presented many times over their career: given a bunch of data, make it presentable to humans. Most likely, eventually, some human will see the output of the code that you've written. You need to consider human factors when presenting that output. Data transformation and enrichment are tasks that most software engineers must do to get their features implemented.
Flask is pretty aggressive with its caching of static assets. Make sure you open your developer tools, go to the "Network" tab, and click on "Disable cache" if it isn't already checked. Leave the tools open while you work, otherwise the "Disable cache" is ignored.
To start doing this, create a static directory in your app directory. Then,
create a styles directory under the static directory. In there, create a
file named calendar.css.
In the main.html, in the head element, link that stylesheet to your HTML
page. To figure out the path for it, please refer to Routing In Flask.
Now, change the Jinja instructions, HTML, and add CSS to get something akin to
the daily layout in the screenshot above. You can also do data manipulation in
the daily method to make it easier to use in the Jinja template. For example,
you can have code that looks like this:
rows = [(id, start, (end - start).seconds / 60 // 15, title)
        for id, start, end, title in rows]
which will transform the third entry in each of the rows to the number of 15-minute blocks the appointment takes.
A nice way to attack this problem is to write the HTML that you would like to use in the Jinja template. Then, figure out how to make the data fit what you want to output.