JBDev用于Xcode越狱开发及巨魔开发,提供和普通App一样的开发体验,使用Xcode进行编译——安装——调试,已测试环境:
- Xcode12-15
- iOS12-16
- arm64/arm64e
- Checkra1n/Unc0ver/Taurine/Palera1n/Dopamine
- 有根/无根/隐根
- 支持越狱(有根/无根/隐根)App开发&源码级调试
- 支持巨魔App开发&源码级调试
- 支持Xcode调试任意进程
注意事项
- JBDev只能用于越狱设备上调试
- 使用JBDev越狱开发时,打包功能依赖于Theos
- 使用JBDev巨魔开发时,确保已安装TrollStore
常见项目类型调试方式一览
| 项目类型 | Xcode调试 | 调试类型 |
|---|---|---|
| 越狱App | JBDev | 启动调试/附加调试/等待调试 |
| 越狱Tweak/Tool | JBDev | 附加调试/等待调试 |
| 巨魔App | JBDev | 启动调试/附加调试/等待调试 |
| 非越狱App | MonkeyDev | 启动调试/附加调试/等待调试 |
注:
- 启动调试,使用Xcode启动App并使其等待调试器附加
- 附加调试,进程已启动情况下附加调试,lldb使用方式
debugserver --attach=[pid|name],Xcode同理 - 等待调试,等待进程启动并自动附加调试,lldb使用方式
debugserver -waitfor=[name],Xcode同理
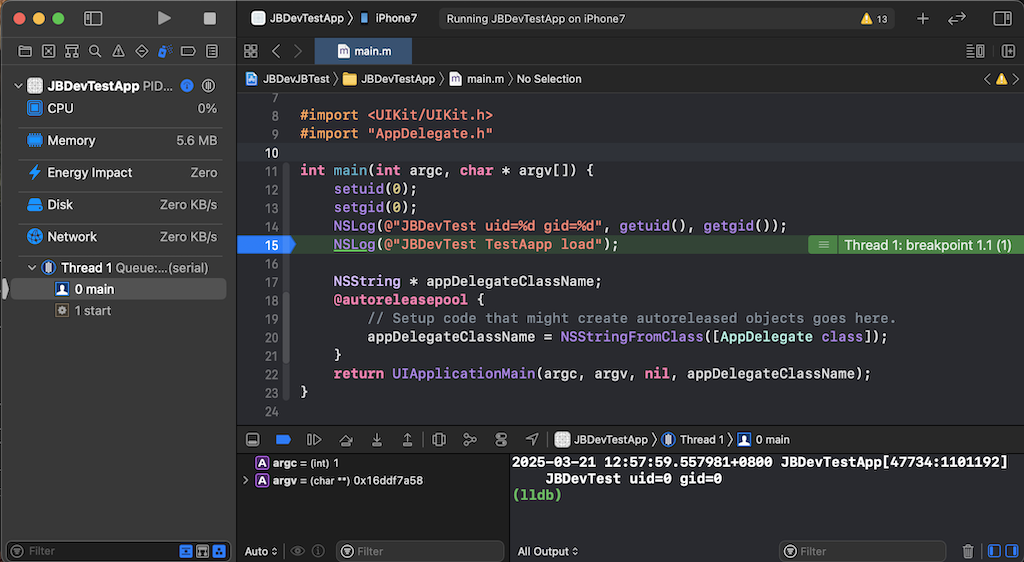
- iOS端越狱;安装appsync(可选,用于调试普通未签名App);从
https://github.com/lich4/JBDev/releases下载安装合适的jbdev.deb - Mac端安装支持隐根的Theos,参考
https://github.com/roothide/Developer - 测试
JBDevJBTest,将变量THEOS改成Theos安装路径 - 全新创建你自己的项目,并使用JBDev开发
JBDev核心文件
jbdev.plist,控制JBDev在iOS端行为配置文件,开发阶段需随App一起打包,字段如下-
type: 指定JBDev以何种方式打包安装,可指定app/jailbreak/trollstore
jbdev.build.sh,控制JBDev打包的脚本
JBDev核心设置(环境变量)
THEOS,指定Theos安装路径JBDEV_PACKAGE,应用于App类型Target,用于控制最终打包&安装&调试
详细实例见JBDevJBTest
以下配置不依赖于iOSOpenDev/MonkeyDev
使用Xcode建立等同于
theos/application的项目
- File - New - Target - iOS - App
- 此为主Target,用于JBDev交互打包/安装/调试
使用Xcode建立等同于
theos/tweak的项目
- File - New - Target - macOS - Library
- Build Settings -
Base SDK设置为iOS,同时部署Device设置为iOS设备
使用Xcode建立等同于
theos/tool的项目
- File - New - Target - macOS - CommandLineTool
- Build Settings -
Base SDK设置为iOS,同时部署Device设置为iOS设备
配置文件
- 所有需要ldid签名的Target在自身目录下添加plist文件
- 将
jbdev.build.sh放在.xcodeproj同级目录 - 将
jbdev.plist放在.xcodeproj同级目录,设置type为jailbreak
配置
Build Settings
- 所有Target调整
Installation Directory - Project新增
CODE_SIGNING_ALLOWED,设置为NO - Project新增
THEOS,设置为theos路径 - 主Target新增
JBDEV_PACKAGE,设置为YES(此变量控制是否打包)
配置
Build Phase
- 所有Target添加
Run Script最后执行,设置为bash jbdev.build.sh - 主Target将其他Target设置为依赖项
Theos支持为有根/无根/隐根提供layout扩展
layout_root目录,存放有根与无根/隐根文件difflayout_rootless目录,存放无根与有根/隐根文件difflayout_roothide目录,存放隐根与有根/无根文件diff
常用diff文件如下
layout*/DEBIAN/control,-
- 有根
Architecture为iphoneos-arm
- 有根
-
- 无根
Architecture为iphoneos-arm64
- 无根
-
- 隐根
Architecture为iphoneos-arm64e
- 隐根
layout*/DEBIAN/{preinst,postinst,extrainst_,prerm,postrm}layout*/Library/LaunchDaemons/*.plist
注意事项
layout/DEBIAN/control的Architecture和Xcode Build Settings的Architecture没有关系,有根包的实际arch可以为armv7/arm64/arm64e,无根包/隐根包的实际arch可以为arm64/arm64e- 必须在
layout/DEBIAN的postinst或extrainst_中执行uicache否则因系统App未注册而安装失败
此方式每次可编译有根/无根/隐根中的一种,操作方式如下
通用
- Tweak设置
Runpath Search PathsHeader Search PathsFramework Search Paths - Tweak链接
libsubstrate.tbd
有根
- 所有Target的
Build Settings的THEOS_PACKAGE_SCHEME删除
无根
- 所有Target的
Build Settings的THEOS_PACKAGE_SCHEME设置为rootless Preprocessor Macros中设置THEOS_PACKAGE_SCHEME_ROOTLESS
隐根
- 所有Target的
Build Settings的THEOS_PACKAGE_SCHEME设置为roothide Preprocessor Macros中设置THEOS_PACKAGE_SCHEME_ROOTHIDE- Tweak链接
libroothide.tbd
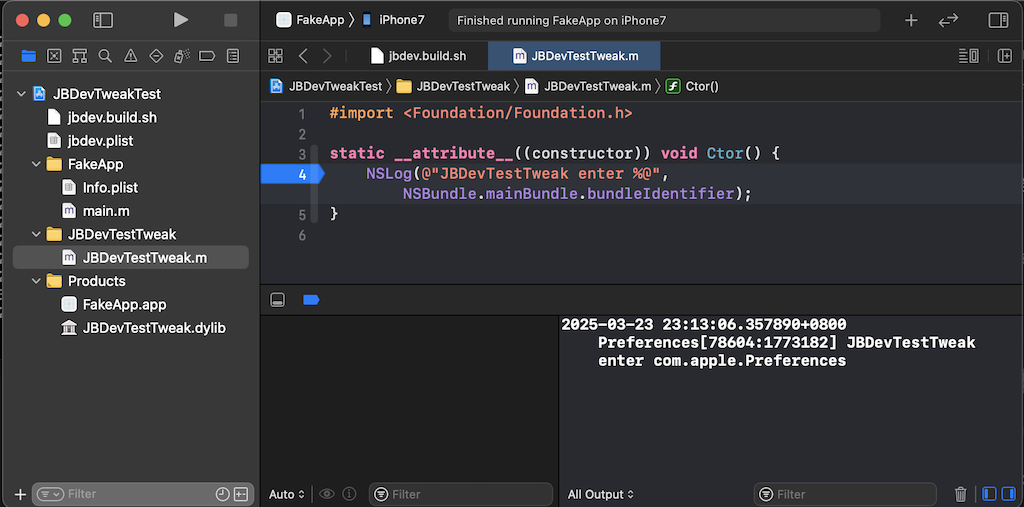
详细实例见JBDevTweakTest。由于JBDev可以调试任意App,因此可以源码级调试注入App的Tweak。原理如下:
- 建立一个和目标App的BundleID相同的空App(
FakeApp) - Xcode执行打包安装调试,JBDev跳过安装
- 目标App启动,开始调试Tweak
使用Xcode建立
FakeApp
- File - New - Target - iOS - App
配置文件
- 将
jbdev.build.sh放在.xcodeproj同级目录 - 将
jbdev.plist放在.xcodeproj同级目录,设置type为jailbreak
配置
Build Settings
- 所有Target新增
CODE_SIGNING_ALLOWED,设置为NO FakeApp新增JBDEV_PACKAGE,设置为YES(此变量控制是否打包)FakeApp新增JBDEV_NO_COPY,防止安装FakeApp本身
配置
Build Phase
- 所有Target添加
Run Script最后执行,设置为bash jbdev.build.sh FakeApp将Tweak设置为依赖项
注意
SpringBoard不属于App类型,不可以启动调试- 由于Xcode不支持非源码下断点,因此不支持调试logos语法的Tweak,如果谁有黑科技可以实现强制下断点请在issue里提交
详细实例见JBDevTSTest。前置条件:iOS系统需要能越狱且能使用巨魔
使用Xcode建立普通iOS-App的项目
- File - New - Target - iOS - App
配置文件
- 在自身Target目录下添加需要签名的plist文件
- 将
jbdev.build.sh放在.xcodeproj同级目录 - 将
jbdev.plist放在.xcodeproj同级目录,设置type为trollstore
配置
Build Settings
- Target新增
CODE_SIGNING_ALLOWED,设置为NO - Target新增
JBDEV_PACKAGE,设置为YES(此变量控制是否打包)
配置
Build Phase
- 所有Target添加
Run Script最后执行,设置为bash jbdev.build.sh
注意事项
- 巨魔App开发,由于纯巨魔环境与越狱环境有较大差异,因此后续需要在纯巨魔环境进一步测试
cd JBDev
make clean; make package
make clean; make package THEOS_PACKAGE_SCHEME=rootless
make clean; make package THEOS_PACKAGE_SCHEME=roothide在使用JBDev遇到问题时,可以
- 查看系统日志(前缀
JBDev) - 查看文件日志
/tmp/jbdev.log
其他注意事项
- 对于iOS>=15,首次连接Mac必须使用XCode>=13,否则会因生成的符号缓存有误导致lldb初始化时间巨长,若已生成错误的符号缓存可以在此目录手动删除
~/Library/Developer/Xcode/iOS DeviceSupport/[设备]
A system application with the given bundle identifier is already installed on the device and cannot be replaced.
- 原因:安装成功但获取App信息失败(如
extrainst_未执行uicache) - 解决:直接dpkg卸载报错,需要先手动安装deb,再卸载deb;或者手动删App目录再uicache
- 注意:
uicache根据越狱工具不同参数不同
Failed to start remote service "com.apple.debugserver" on device.
- 解决:插拔usb重试
dyld[15323]: terminating because inserted dylib '/Developer/usr/lib/libBacktraceRecording.dylib' could not be loaded: tried: '/usr/lib/system/introspection/libBacktraceRecording.dylib' (no such file, not in dyld cache), '/Developer/usr/lib/libBacktraceRecording.dylib' (no such file), '/private/preboot/Cryptexes/OS/Developer/usr/lib/libBacktraceRecording.dylib' (no such file), '/Developer/usr/lib/libBacktraceRecording.dylib' (no such file)
- 原因: 使用Xcode<=13调试iOS>=16
- 解决: 使用Xcode>=14调试 或 在
Product - Edit Scheme - Run - Options/Diagnostics关闭对应选项
dpkg: error processing archive /var/mobile/Media/PublicStaging/JBDevTestApp.app/payload.deb (--install):
 package architecture (iphoneos-arm) does not match system (iphoneos-arm64)
Errors were encountered while processing:
 /var/mobile/Media/PublicStaging/JBDevTestApp.app/payload.deb
- 原因: 有根/无根/隐根越狱环境和deb包不匹配
- 解决: 有根/无根/隐根分别使用对应Xcode设置编译deb
Xcode编译错误
error: Sandbox: bash(27852) deny(1) file-read-data /path/to/jbdev.build.sh
- 原因: Xcode15默认开启
User Script Sandboxing - 解决: 在
Build Settings中禁用User Script Sandboxing
Xcode一直安装不停止
- 解决: 杀掉iOS进程
streaming_zip_conduit/installd
在无根/隐根/巨魔下用rm命令无法删除沙盒目录
- 解决: 重签名
rm
<?xml version="1.0" encoding="UTF-8"?>
<!DOCTYPE plist PUBLIC "-//Apple//DTD PLIST 1.0//EN" "http://www.apple.com/DTDs/PropertyList-1.0.dtd">
<plist version="1.0">
<dict>
	<key>platform-application</key>
	<true/>
	<key>com.apple.private.MobileContainerManager.allowed</key>
	<true/>
	<key>com.apple.private.security.no-container</key>
	<true/>
	<key>com.apple.private.security.storage.AppBundles</key>
	<true/>
	<key>com.apple.private.security.storage.AppDataContainers</key>
	<true/>
	<key>com.apple.private.skip-library-validation</key>
	<true/>
	<key>com.apple.security.exception.files.absolute-path.read-write</key>
	<string>/var/</string>
	<key>task_for_pid-allow</key>
	<true/>
</dict>
</plist>
JBDev is a powerful tool for Jailbreak/TrollStore development with Xcode, providing the same experience as common app development: compile - install - debug app with Xcode, tested on
- Xcode12-15
- iOS12-16
- arm64/arm64e
- Checkra1n/Unc0ver/Taurine/Palera1n/Dopamine
- rootful/rootless/roothide
- Jailbreak(rootful/rootless/roothide) development with source-level debugging with Xcode
- TrollStore development with source-level debugging with Xcode
- Debug any process with Xcode
Notice
- JBDev is used on jailbreak devices
- For Jailbreak development, JBDev use Theos to package
- For TrollStore development, make sure TrollStore is installed
Debugging methods with Xcode overview
| Project Type | Xcode Debugging | Debugging type |
|---|---|---|
| JB App | JBDev | Spawn/Attach/Wait |
| JB Tweak/Tool | JBDev | Spawn/Wait |
| TrollStore | JBDev | Spawn/Attach/Wait |
| NonJB App | MonkeyDev | Spawn/Attach/Wait |
- Spawn: Spawn the app and force it to wait debugger
- Attach: Attach to the process already started.
debugserver --attach=[pid|name]for lldb - Wait: Wait the process to start and attach to it later automatically.
debugserver -waitfor=[name]for lldb
- Get ready with a jailbreak iDevice
- Install appsync(optional); Download and install
jbdev.debfromhttps://github.com/lich4/JBDev/releases - Install Theos on macOS,
https://github.com/roothide/Developer - Test the demo
JBDevJBTestwithTHEOSsetting to the install path of Theos - After getting familiar with the basic usage of JBDev, try setting up a whole new project as described in Readme, and build your own project with JBDev
- Enjoy
JBDev core files
jbdev.plist, Control the behaviour of JBDev on iOS. need to be packaged together with app(target type) during development phase, containing following fields-
type, Specify packaging type, the value can be one ofapp/jailbreak/trollstore
jbdev.build.sh, Control the behaviour of packaging of Xcode
JBDev core env
THEOS, Specify the installing path of TheosJBDEV_PACKAGE, Control packaging, for app type target only
See JBDevJBTest for details
Set up a project identical to
theos/application
- File - New - Target - iOS - App
- This is the main target
Set up a project identical to
theos/tweak
- File - New - Target - macOS - Library
- Build Settings - set
Base SDKtoiOS,and set the deployment target to your iOS device
Set up a project identical to
theos/tool
- File - New - Target - macOS - CommandLineTool
- Build Settings - set
Base SDKtoiOS,and set the deployment target to your iOS device
Prepare files
- Add entitlement plist files to the target sourcecode directory for each target
- Put
jbdev.build.shto the same directory level of.xcodeproj - Put
jbdev.plistto the same directory level of.xcodeproj, and settypetojailbreak
Configure
Build Settings
- Set
Installation Directoryfor all targets - Add
CODE_SIGNING_ALLOWEDto project and set to NO - Add
THEOSto project according to the path of your theos - Add
JBDEV_PACKAGEto the main target and set to YES
Configure
Build Phase
- Add
Run Scriptto all target as the last phase,and set the content tobash jbdev.build.sh - Add all other targets to the main target as dependency
JBDev support rootful/rootless/roothide well as follows
layout_rootdirectory,stores the diffs from rootful to rootless/roothidelayout_rootlessdirectory,stores the diffs from rootless to rootful/roothidelayout_roothidedirectory,stores the diffs from roothide to rootful/rootless
Commonly used diffs
layout*/DEBIAN/control,-
Architectureisiphoneos-armfor rootful
-
Architectureisiphoneos-arm64for rootless
-
Architectureisiphoneos-arm64efor roothide
layout*/DEBIAN/{preinst,postinst,extrainst_,prerm,postrm}layout*/Library/LaunchDaemons/*.plist
Notice
- The value of
Architectureinlayout/DEBIAN/controlhas nothing to do withArchitectureinXcode Build Settings, available arch for rootful isarmv7/arm64/arm64e, andarm64/arm64efor rootless/roothide - There must be
uicacheinpostinst/extrainst_file inlayout/DEBIAN, or installing from Xcode will fail for system app not installed
general
- For tweak target, set
Runpath Search PathsHeader Search PathsFramework Search Paths - For tweak target, link
libsubstrate.tbd
rootful
- For all targets, remove
THEOS_PACKAGE_SCHEMEfromBuild Settings
rootless
- For all targets, set
THEOS_PACKAGE_SCHEMEinBuild Settingstorootless - Set
THEOS_PACKAGE_SCHEME_ROOTLESSinPreprocessor Macros
roothide
- For all targets, set
THEOS_PACKAGE_SCHEMEinBuild Settingstoroothide - Set
Preprocessor MacrosinTHEOS_PACKAGE_SCHEME_ROOTHIDE - For tweak target, link
libroothide.tbd
See JBDevTweakTest for details. JBDev can used to debug any app, as well as debug the tweak injected to app from source-level, the process is as follows:
- Setup an empty app target with the same BundleID as the target App(
FakeApp) - Perform packaging & installing & debugging with Xcode, and JBDev will skip installing
FakeApp - Start debugging after target app spawned
Set up
FakeApp
- File - New - Target - iOS - App
Prepare files
- Add entitlement plist files to the target sourcecode directory for each target
- Put
jbdev.build.shto the same directory level of.xcodeproj - Put
jbdev.plistto the same directory level of.xcodeproj, and settypetojailbreak
Configure
Build Settings
- Add
CODE_SIGNING_ALLOWEDto project and set to NO - Add
JBDEV_PACKAGEto the target and set to YES - Add
JBDEV_NO_COPYtoFakeAppto prevent JBDev from installing itself
Configure
Build Phase
- Add
Run Scriptto all targets as the last phase,and set the content tobash jbdev.build.sh
Notice
SpringBoardis not of app type, and cannot be debugged in this way- Logos is not supported by JBDev, since Xcode do not support breakpoints in non-source files.
See JBDevTSTest for details
Set up an iOS App project
- File - New - Target - iOS - App
Prepare files
- Add entitlement plist files to the target sourcecode directory for each target
- Put
jbdev.build.shto the same directory level of.xcodeproj - Put
jbdev.plistto the same directory level of.xcodeproj, and settypetotrollstore
Configure
Build Settings
- Add
CODE_SIGNING_ALLOWEDto project and set to NO - Add
JBDEV_PACKAGEto the target and set to YES
Configure
Build Phase
- Add
Run Scriptto the target as the last phase,and set the content tobash jbdev.build.sh
Notice
- Due to the huge difference between Jailbreak and pure TrollStore environment, Further testing on pure TrollStore is required
cd JBDev
make clean; make package
make clean; make package THEOS_PACKAGE_SCHEME=rootless
make clean; make package THEOS_PACKAGE_SCHEME=roothideAny problems with JBDev
- View iOS system log(prefix
JBDev) - View iOS file log in
/tmp/jbdev.log
A system application with the given bundle identifier is already installed on the device and cannot be replaced.
- Reason:
uicacheis not specified inextrainst_/postinst - Fix: Reinstall and uninstall deb package manually, or run
uicacheafter deleting app directory manully
Failed to start remote service "com.apple.debugserver" on device.
- Fix: Replug the usb cable
dyld[15323]: terminating because inserted dylib '/Developer/usr/lib/libBacktraceRecording.dylib' could not be loaded: tried: '/usr/lib/system/introspection/libBacktraceRecording.dylib' (no such file, not in dyld cache), '/Developer/usr/lib/libBacktraceRecording.dylib' (no such file), '/private/preboot/Cryptexes/OS/Developer/usr/lib/libBacktraceRecording.dylib' (no such file), '/Developer/usr/lib/libBacktraceRecording.dylib' (no such file)
- Reason: Debugging iOS>=16 with Xcode<=13 mistakenly
- Fix: Use Xcode>=14 instead, or adjust options in
Product - Edit Scheme - Run - Options/Diagnostics
dpkg: error processing archive /var/mobile/Media/PublicStaging/JBDevTestApp.app/payload.deb (--install):
 package architecture (iphoneos-arm) does not match system (iphoneos-arm64)
Errors were encountered while processing:
 /var/mobile/Media/PublicStaging/JBDevTestApp.app/payload.deb
- Reason: The deb package does not match rootful/rootless/roothide jailbreak
- Fix: Use the corresponding Xcode settings to compile deb for rootful/rootless/roothide jailbreak
Xcode build error
error: Sandbox: bash(27852) deny(1) file-read-data /path/to/jbdev.build.sh
- Reason: From Xcode15
User Script Sandboxingis enabled by default - Fix: Disable
User Script SandboxinginBuild Settings
Xcode never stop installing
- Fix: kill iOS process
streaming_zip_conduit/installd
Remove app sandbox directory failed with rm in rootless/roothide/trollstore environment:
- Fix: resign
rmwith following entitlement
<?xml version="1.0" encoding="UTF-8"?>
<!DOCTYPE plist PUBLIC "-//Apple//DTD PLIST 1.0//EN" "http://www.apple.com/DTDs/PropertyList-1.0.dtd">
<plist version="1.0">
<dict>
	<key>platform-application</key>
	<true/>
	<key>com.apple.private.MobileContainerManager.allowed</key>
	<true/>
	<key>com.apple.private.security.no-container</key>
	<true/>
	<key>com.apple.private.security.storage.AppBundles</key>
	<true/>
	<key>com.apple.private.security.storage.AppDataContainers</key>
	<true/>
	<key>com.apple.private.skip-library-validation</key>
	<true/>
	<key>com.apple.security.exception.files.absolute-path.read-write</key>
	<string>/var/</string>
	<key>task_for_pid-allow</key>
	<true/>
</dict>
</plist>