This is a fork and updated version of the original Openframe Frame Conroller project. This README file explains how to install and configure the Openframe frame controller.
To install and configure an Openframe frame controller run the following command:
bash <(curl -s https://raw.githubusercontent.com/mataebi/Openframe-FrameController/master/setup/install.sh)
After asking you some questions about the setup you would like to use the install script should take care of the rest.
You may uninstall the software by using the uninstall script running the following comand:
bash <(curl -s https://raw.githubusercontent.com/mataebi/Openframe-FrameController/master/setup/uninstall.sh)
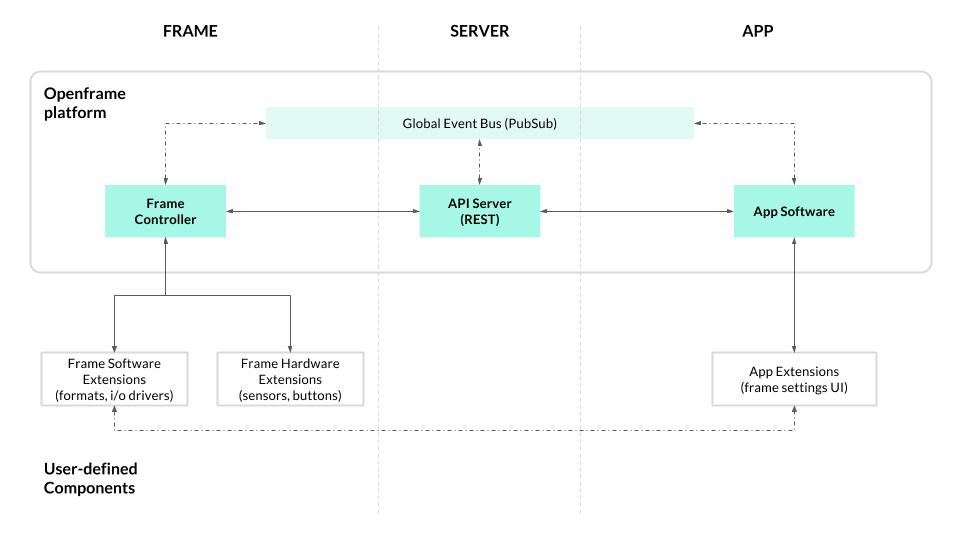
The Openframe frame controller is the software that runs on the frame itself (i.e. the RPi), acting as a process manager for starting, stopping, and transitioning between artworks. It communicates with an Openframe API Server server via a REST API, and connects to a global event system allowing for realtime updates. The idea is to work towards a system which supports the basic goals of Openframe, guided by a handful of pilot use cases.
The block diagram below represents the proposed architecture for the Openframe platform as of today
The Openframe frame controller is based on nodejs and npm so these packages have to be installed first. There are two ways to do this which are explained below.
In order to be able to run the frame controller software without root privileges but still be able to easily install node modules the software needs to run based on the node virtual machine (nmv). This also makes it possible to test the software with different vesions of the underlying node environment. In order to install nvm use the following commands:
curl -s https://raw.githubusercontent.com/creationix/nvm/v0.33.0/install.sh | bash
source ~/.bashrc
After installing nvm the system is now ready to install any version of node and npm needed. You may just use the major version number for installation and nvm will automatically figure out the latetst minor and patch version. nodejs 14 has proven to run well with the Openframe frame controller. So use the following commands to install it:
nvm install 14
To list the versions available under nvm use the following command:
nvm ls
        v7.10.1
        v8.17.0
        v9.11.2
       v12.22.6
->     v14.18.0
To activate one of the available version use the following command
nvm use 14
Now using node v14.18.0 (npm v6.14.15)
Change to the current users home directory and clone the Openframe-FrameController repository from https://github.com/mataebi/Openframe-FrameController.git
cd
git clone https://github.com/mataebi/Openframe-FrameController.git
cd Openframe-FrameController
Do not run the install.sh script in the repository as it would try to install the frame controller software from npm.
Now setup the settings directory manually and copy the main configuration file (.ofrc) and the autostart script into it
mkdir -p ~/.openframe
cp -p .ofrc ~/.openframe/
env | grep NVM_ > ~/.openframe/.env
echo "PATH=$PATH" >> ~/.openframe/.env
cp ./scripts/autoboot.sh ~/.openframe/autoboot.sh
If you plan to setup and use your own Openframe server instead of the public system available at www.openframe.io you need to edit the frame controller configuration file (.ofrc) and adjust the URLs of the API and the web app server to match your services.
vi ~/.openframe/.ofrc
...
    "api_base": "https://oframe-api.example.com",
    "app_base": "https://oframe.example.com"
...
Now run npm install and npm audit fix to download and install all dependencies for the frame controller package and make sure at least part of the potential security risks in depnendencies are properly taken care of. This installation will also include the installtion of the four default extensions that will be downloaded and installed from npmjs.com.
Each of these extensions needs certain tools, libraries and executables that will also be installed during code initialization. So at each question asking Do you want to continue? [Y/n] just answer with y.
npm install
npm audit fix
To start, stop and monitor the frame controller software we use a system service in the background. So you need to install and activate the system service definition (of-framectrl.service) delivered as part of this repository executing the following commands:
sudo cp -p ~/Openframe-FrameController/scripts/of-framectrl.service /lib/systemd/system/
sudo systemctl daemon-reload
sudo systemctl enable of-framectrl.service
sudo systemctl enable systemd-networkd-wait-online.service
Activate the openframe command by creating a link, then start the openframe software.
sudo ln -s ~/Openframe-FrameController/bin/cli.js /usr/local/bin/openframe
openframe
Once started, the first time or when using the -r or '--reset' option to reconfigure the frane, the Openframe frame controller software will ask you the following questions to connect the frame o the Openframe services:
...
? Enter your Openframe username: ppan
? Enter your Openframe password: ******
? Enter a name for this Frame: my-frame
? Do you want to boot openframe on startup?: (Y/n) y
After a shor while you should see the following messages indicating that the software has been started properly:
[o]   Connected! You can now push artwork to this frame.
This frame should now appear as my-frame when you log into Openframe at https://oframe.example.com.
If something goes wrong and you need logging information to figure out what the problem might be, use the following command. Usng the -fopion will show the latest log information in an ongoing way. Leaving this flag away will instead show all log information collected so far:
journalctl -f -u of-framectrl
To stop the openframe controller software use the following command:
openframe -s
If you wan to reset the frame to rename it, connec i to a different server or change the credentias used to login to the openframe server use the command below. This will reset all configuration data and announce the frame as a new device to the servers specified in ~/.openframe/.ofrc:
openframe -r
? Enter your Openframe username: ppan
...
To install or remove a openframe viewer extension use the following commands:
# Install openframe extension
openframe -i <extension-name> #

# Uninstall openframe extension
openframe -u <extension-name> #
<extension-name> must be specified as one of the following
# Gihtub repository, master branch
gihub:mataebi/Openframe-ImageViewer

# Gihtub repository, specific branch, e.g. mybranch
gihub:mataebi/Openframe-ImageViewer#mybranch

# Local directory containing the files of an extension
file:~/my-local-ext/

# NPM package name (latest version)
openframe-image

# NPM package name, specific version
openframe-image@^0.1.0
After (un)installing an extension, you have to stop and start the openframe controller in order to activate the change
openframe -s; openframe
controller.js- manages the actions around controlling the frame (changing artwork, updating settings, etc.)process-manager.js- manages starting and stopping processes for displaying artworksextensions-manager.js- manages installing and initializing extensions (aka plugins)frame.js- a wrapper for the Frame model, which gets persisted touser.js- a wrapper for the User modelpubsub.js- creates and manages connection to global event systemrest.js- creates and manages connection to REST API via Swagger.jsdownloader.js- utility for downloading filesconfig.js- configuration options
Upon startup, the application will prompt you for your Openframe username and password, and a name for this frame. You can run this on a mac or linux machine (windows untested), though various artwork format extensions are likely to be developed with a specific target platform in mind.
For DEBUG output, set the DEBUG env var:
$ DEBUG=* openframeWhen you run npm install, the install.sh script will be executed. This script creates a hidden directory, .openframe, in your user home folder (/home/{username}/.openframe), and copies the default .ofrcconfiguration file there. The .ofrc file contains the server settings — by default this will point to the hosted API server at openframe.io, but if you're running a local server for development or are hosting your own API server you can update the settings in .ofrc accordingly.
After starting the application and answering the prompts, two additional files are created in the .openframe dir, frame.json which stores the frame state, and user.json which stores user data.
Extensions are npm packages which add functionality to the frame, either by adding support for a new artwork format (i.e. media type) or by adding other functionality.
For more info on extensions, see the Openframe-Extension repo.