In this project you will build a homemade, web-based music player that resembles Spotify. This will demonstrate your ability to (1) organize and create data files according to a schema; (2) ingest those data using cloud-native techniques; (3) store each song's metadata in a relational database; and (4) expose that data in an API endpoint.
-
Explore a sample Frontend of this project.
-
Explore two sample API Resources for this project:
Create your own fork of this repo to track your work. You do not need to submit a pull request back to the upstream; simply track your code and push/pull back to your own fork.
Much of the infrastructure for this project is created with an Amazon CloudFormation template. Details for each resource are below.
The CF template creates an S3 bucket based on your UVA computing ID, plus -dp1-spotify. This bucket will be configured with a few special options:
- All objects will be visible to the public.
- The bucket will be configured as a website.
- The bucket will allow instructional staff to upload objects.
For each song you will upload a 3-file bundle associated with it: The MP3 song file, a JSON metadata file, and a JPG album image.
You will also upload a customized index.html file to serve as the user interface for your music player.
AWS Lambda is a "serverless" framework that enables users to publish code that is triggered by an event. It is an incredibly useful service since you do not need to worry about any other infrastructure to support it (servers, containers, etc.) and it can be triggered by a large number of events.
You will manually create a Lambda function using a Python3 library named Chalice. Chalice will create a Lambda function associated with your bucket, and will run your code each time a new .json object is uploaded.
Chalice configures the bucket-to-function connection, and can be easily deployed and re-deployed using simple commands.
All students will share a single RDS database service provided by the instructor. You do not need to create a database server yourself, but you will create a new database and all the necessary tables within it.
You will be provided connection information and instructions in the Canvas assignment page.
The CF template will create an EC2 instance for you with the following features configured/installed:
- Docker
- Fixed IP address (ElasticIP)
- Port 80 visible to the Internet [
0.0.0.0/0]
You will build and run the FastAPI container you have already been working with for your API. You will make two important additions to your API:
- MySQL connection libraries
- A new
/songsendpoint using the GET method that lists your song metadata.
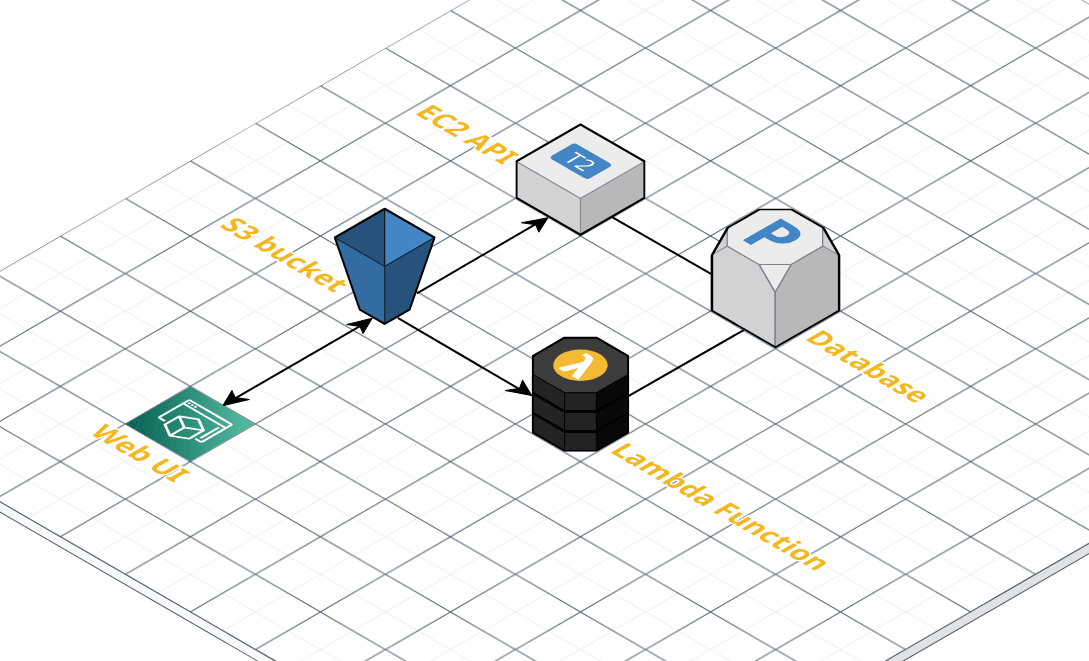
These are the steps that must occur when a new song is added to your music player:
-
The song file bundle (3 files) is uploaded to your S3 bucket.
-
The arrival of a new
.jsonfile triggers your Lambda function to execute. -
Your Lambda function retrieves the JSON metadata file and parses it. It then calculates the name of the MP3 and JPG files associated with the song metadata, and generates the full S3 URI to each of those files.
-
It performs a MySQL
INSERTquery to add the new song to yoursongsdatabase. These are the fields it inserts:title- The song title (string)artist- The musical artist (string)album- The album containing the song (string)genre- The index of the genre (integer)year- The year of the song (integer)file- The full S3 URI to the MP3 fileimage- The full S3 URI to the JPG image
-
Data inserted into the
songstable of your database are immediately available in your API's/songsendpoint as aGETmethod. This API serves as your "data presentation layer". Here is an example:https://bv1e9klemd.execute-api.us-east-1.amazonaws.com/api/songs
-
Your song player's frontend (your S3 bucket website, with the
index.htmladded) can then be refreshed to display the new song after ingestion. Here is an example:http://nem2p-dp1-spotify.s3-website-us-east-1.amazonaws.com/
Songs must consist of three items matching in name, each with a unique suffix. Do not zip, bundle, or put them into separate directories:
An example:
9e4d555f.mp3- The MP3 file of the song itself.9e4d555f.jpg- A JPG file for the song/artist. Do not use.gifor.pngfiles.9e4d555f.json- A data blob containing metadata for the song. See below for an example.
Song Metadata
{
  "title": "Starting Over",
  "album": "Starting Over",
  "artist": "Chris Stapleton",
  "genre": 6,
  "year": 2020
}
Each song package (all 3 files) must contain five data points: title, album, artist, and the integers of the song's genre (according to the genres API above) and year.
Your first task is to collect at least ten (10) songs and create their associated metadata files.
- MP3 files - can be created from YouTube videos using tools such as this.
- Metadata JSON files - can be written by hand using the schema above.
- Album Cover Art (optional) - must be a JPG file. The ideal size is 200x200 pixels, with a 72ppi resolution.
Remember that each bundle needs a unique, matching set of file names. To create a unique 8-character name for your song bundle, you might want to use this ID generator API! http://ids-sds.pods.uvarc.io/id/8
Put your song bundles in a separate songs directory within your project but do not upload them to S3 yet.
NOTE: Copyright laws prohibit the redistribution or sale of creative material, but our purposes here are academic and temporary. You should not distribute your application URL.
Open the link below in a new browser tab:
BE SURE TO LAUNCH YOUR STACK IN THE us-east-1 REGION WITHIN AWS. This will not deploy in another region.
 - Data Project 1 Resources Template
Notes about this template:
- You will be asked for your UVA computing ID. Be sure this is correct.
- You will be asked to select an SSH key for connecting to your EC2 instance.
- Note the outputs of your CF Stack:
- EC2 Instance IP Address - The instance you will shell into and run your FastAPI container. It will also be the address for your API endpoint, i.e.
http://12.34.56.78/etc. - S3 Bucket Name - In the format of
<uvaid>-dp1-spotify. The bucket you will upload your song files andindex.htmlto. - S3 Website URL - The address of your music player.
- EC2 Instance IP Address - The instance you will shell into and run your FastAPI container. It will also be the address for your API endpoint, i.e.
- Your stack should build completely within 2-3 minutes.
Using either the mysql command-line (built into your EC2 instance) or the PhpMyAdmin console, connect to the RDS instance using the credentials given to you in the assignment page.
Use the prebuilt dbconn command and provide the password when asked, or run this command yourself:
mysql -h ds2022.cqee4iwdcaph.us-east-1.rds.amazonaws.com -u admin -p
Or use a simple web interface by running this command in Docker. It will then be available to you at http://127.0.0.1:8080/:
docker run -d -e PMA_ARBITRARY=1 -p 8080:80 phpmyadmin
Then supply the server, username, and password from the assignment in Canvas.
If using the mysql CLI, enter this command, replacing XXXX with your UVA computing ID. Then issue the command to use the database you create.
create database XXXXX;
use XXXXX;
If using PhpMyAdmin, find the list of databases in the lefthand navigation and click on NEW. Provide your UVA computing ID as the name of the database and click CREATE.
Refer to the two schemas below to create the songs and genres tables.
If using the mysql command-line you can paste these queries into the console.
If using PhpMyAdmin, click into your database and then find the SQL tab. You can execute the query by clicking the GO button at the bottom.
genres
CREATE TABLE `genres` (
  `genreid` int NOT NULL,
  `genre` varchar(20) DEFAULT NULL
) ENGINE=InnoDB DEFAULT CHARSET=utf8mb4 COLLATE=utf8mb4_0900_ai_ci;
INSERT INTO `genres` (`genreid`, `genre`) VALUES
  (1, 'Rock'),
  (2, 'Indie'),
  (3, 'Pop'),
  (4, 'Hiphop'),
  (5, 'Jazz'),
  (6, 'Country'),
  (7, 'Classical'),
  (8, 'Other');
ALTER TABLE `genres`
  ADD PRIMARY KEY (`genreid`);
ALTER TABLE `genres`
  MODIFY `genreid` int NOT NULL AUTO_INCREMENT;
COMMIT;
songs
CREATE TABLE `songs` (
  `id` int NOT NULL,
  `title` varchar(50) DEFAULT NULL,
  `album` varchar(30) DEFAULT NULL,
  `artist` varchar(30) DEFAULT NULL,
  `genre` int DEFAULT NULL,
  `year` int DEFAULT NULL,
  `file` varchar(200) CHARACTER SET utf8mb4 COLLATE utf8mb4_0900_ai_ci DEFAULT NULL,
  `image` varchar(150) DEFAULT NULL
) ENGINE=InnoDB DEFAULT CHARSET=utf8mb4 COLLATE=utf8mb4_0900_ai_ci;
ALTER TABLE `songs`
  ADD PRIMARY KEY (`id`);
ALTER TABLE `songs`
  MODIFY `id` int NOT NULL AUTO_INCREMENT;
COMMIT;
Using either the mysql CLI or PhpMyAdmin, enter one record so you can test your API connection and display.
Use this sample data to begin:
INSERT INTO `songs` (`id`, `title`, `album`, `artist`, `genre`, `year`, `file`, `image`) VALUES(NULL, 'Starting Over', 'Starting Over', 'Chris Stapleton', 6, 2020, 'https://nem2p-dp1-spotify.s3.us-east-1.amazonaws.com/9e4d555f.mp3', 'https://nem2p-dp1-spotify.s3.us-east-1.amazonaws.com/9e4d555f.jpg');
COMMIT;
To connect your FastAPI application to the MySQL database, you will need to:
- Install the
mysql.connectorpackage - Create a database connection string
- Write the appropriate queries to the database
- Display the data as JSON output from the API
For more information on MySQL and Python, refer to this page.
In your FastAPI application, add the following line to the requirements.txt file:
mysql-connector-python
To develop locally you will also need to install that package in your local environment using pip, pip3, pipenv install, etc.
At the top of your FastAPI code, import the package:
import mysql.connector
You need four elements to connect to the RDS database service:
DBHOST = "ds2022.cqee4iwdcaph.us-east-1.rds.amazonaws.com"
DBUSER = "admin"
DBPASS = os.getenv('DBPASS')
DB = "xxxxx"
Replace the DB name with the name of your database. The password (DBPASS) is the most sensitive piece of the connection, and should be passed into your application as an environment variable.
Find the password value from Canvas and set it in your local environment using the command-line shell:
export DBPASS='xxxxxxxxx'
Finally, bring all of these elements together into a single DB connection string, and create a cursor using that:
db = mysql.connector.connect(user=DBUSER, host=DBHOST, password=DBPASS, database=DB)
cur=db.cursor()
Try running your application and see if you encounter errors. Debug as necessary.
Here is the code for the /genres endpoint. Paste this into your FastAPI application and test:
@app.route('/genres', methods=['GET'], cors=True)
def get_genres():
    query = "SELECT * FROM genres ORDER BY genreid;"
    try:
        cur.execute(query)
        headers=[x[0] for x in cur.description]
        results = cur.fetchall()
        json_data=[]
        for result in results:
            json_data.append(dict(zip(headers,result)))
        output = json.dumps(json_data)
        return(output)
    except mysql.connector.Error as e:
        print("MySQL Error: ", str(e))
        return None
    cur.close()
A few notes about the block above:
- FastAPI requires the route decorator, which specifies the METHOD for that endpoint.
- The
corsvalue is unique to APIs, and indicates that other websites can fetch data from this API. (This is desired.) - The function associated with the decorator takes no parameters.
- The query is standard SQL with no parameters or string replacement.
- The
tryblock executes the SQL using the cursor, creates a header row, fetches all results, then loads the headers and values as a dictionary in each row. It is then output as JSON and returned. - Generic error handling is in place to display any connection or query issues.
- Note the cursor is closed at the end of each function.
Based on the code above, create another endpoint and function for the /songs endpoint. This should return values like this.
The following seven (7) fields must be returned, which requires a JOIN query:
- Song title -
title - Song album -
album - Song artist -
artist - Song year -
year - Song file (MP3) - the full S3 URL to the MP3 file
- Song image (JPG) - the full S3 URL to the image
- Song genre -
genre(from thegenrestable). This value is derived by a JOIN between thesongs.genrevalue (INT) and thegenres.genreidvalue (INT). The result returns a string, not an integer.
Test your API locally to be sure you are getting well-formed results for both the /genres and /songs endpoints. Since you seeded your songs table with a song, you should see one entry as you test.
Try modifying values within the existing record, to see if they are reflected in your API.
Once you are happy with your results, add, commit, and push your code to GitHub. Your FastAPI container should build successfully based on your work in Lab 6.
Shell into the EC2 instance created above in Step Two. The default user is ubuntu, and the connection looks something like:
ssh -i ~/.ssh/MYKEY [email protected]
Go to the GitHub page for your FastAPI repository, and find the "Packages" section in the right-hand navigation. Copy the text in the "Install from the command line" field, which is a docker pull command.
Issue that command from within your EC2 instance to pull the image locally.
Finally, using the full container image name, run the container in detached mode, mapped to port 80 of the instance.
Be sure to pass in the DBPASS value as an environment variable, since that is the last piece your application needs in order to connect to the database.
docker run -d -p 80:80 \
  -e DBPASS="xxxxxx" \
  ghcr.io/xxxx/fastapi-demo:1.17
Issue this command to see if your container is running and get its Container ID:
docker ps
If you want to see the output logs of the container as it runs, specify the container ID name in place of zzzzzz below:
docker logs zzzzzz --follow
To stop the container:
docker stop zzzzz
Open a browser tab to the IP address of your EC2 instance. You should hopefully see a {"hello":"world"} message or something similar.
Go to your /songs endpoint to see if you have good results.
Find the file index.html in this repository (within the /frontend folder) and modify line 23 with a new URL. This URL should consist of your EC2 instance's IP address (from above), plus the /songs endpoint, as an HTTP web address. It should look something like this:
http://12.34.56.78/songs
Save that file, and upload it to the bucket you created in Step Two.
Find the S3 Website URL from that step and open it in another browser tab. That should look something like this, with your bucket name instead:
http://nem2p-dp1-spotify.s3-website-us-east-1.amazonaws.com/
NOTE: Feel free to customize that web page however you like, so long as it still displays your songs for playback. You can change the name, colors, etc.

Let's recap what you have built so far:
- You have a collection of songs ready to upload into your music player, with metadata and (optional) album covers.
- You have created a database with two tables, ready to track new songs as they arrive.
- You have customized your FastAPI to display
/songsand/genres, and deployed that container to an EC2 instance. - You have customized a web interface pointed to your API and deployed it to S3.
The final, missing, piece is an ingestion process to detect the arrival of new songs in your bucket. This is where we will use Chalice to create a Lambda function that listens to your bucket.
Be sure to install the Chalice framework in your local environment using one of the following methods:
pip install chalice
pip3 install chalice
python3 -m pip install chalice
pipenv shell && pipenv install chalice
Next, create a new Chalice application. Within the root directory of your project, issue this command:
chalice new-project
For the project name, call it ingestor or pacman (a process that eats up new things that arrive). For the project type, you can use your up/down arrow keys to select the "S3 Event Handler" then hit return.
Change directories into the new Chalice project directory.
We cannot commit sensitive information (i.e. database connection passwords, etc.) to Git, so let's add to the .gitignore file:
echo ".chalice/config.json" >> .gitignore
Next, edit the .chalice/config.json file that Chalice created automatically. Insert the following lines after your app_name:
  "environment_variables": {
    "DBHOST":"ds2022.cqee4iwdcaph.us-east-1.rds.amazonaws.com",
    "DBPASS":"xxxxxx",
    "DBUSER":"admin",
    "DB":"xxxxx"
  },
Update the DBPASS and DB values accordingly to the password in Canvas and the name of YOUR database. These variables will be deployed to AWS when you publish your function, but will not be committed to GitHub.
Finally, in both requirements files, add these values:
mysql-connector-python
boto3
- See the full code below for a working Lambda function ready to deploy. SOME VALUES NEED UPDATING and COMPLETION. See the notes below the code block.
import os
import json
import mysql.connector
import boto3
from chalice import Chalice

app = Chalice(app_name='backend')
app.debug = True

# s3 things
## UPDATE NEXT LINE
S3_BUCKET = 'nem2p-dp1-spotify'
s3 = boto3.client('s3')

# base URL for accessing the files
## UPDATE NEXT LINE
baseurl = 'http://nem2p-dp1-spotify.s3-website-us-east-1.amazonaws.com/'

# database things
DBHOST = os.getenv('DBHOST')
DBUSER = os.getenv('DBUSER')
DBPASS = os.getenv('DBPASS')
DB = os.getenv('DB')
db = mysql.connector.connect(user=DBUSER, host=DBHOST, password=DBPASS, database=DB)
cur = db.cursor()

# file extensions to trigger on
_SUPPORTED_EXTENSIONS = (
    '.json'
)

# ingestor lambda function
@app.on_s3_event(bucket=S3_BUCKET, events=['s3:ObjectCreated:*'])
def s3_handler(event):
  if _is_json(event.key):
    # get the file, read it, load it into JSON as an object
    response = s3.get_object(Bucket=S3_BUCKET, Key=event.key)
    text = response["Body"].read().decode()
    data = json.loads(text)

    # parse the data fields 1-by-1 from 'data'
    TITLE =
    ALBUM =
    ARTIST =
    YEAR =
    GENRE =

    # get the unique ID for the bundle to build the mp3 and jpg urls
    # you get 5 data points in each new JSON file that arrives, but
    # you need 7 fields for the INSERT. The two additional values are
    # URLs you must formulate given you know the unique ID these files
    # are named.
    keyhead = event.key
    identifier = keyhead.split('.')
    ID = identifier[0]
    MP3 = baseurl + ID + '.mp3'
    IMG = baseurl + ID + '.jpg'

    app.log.debug("Received new song: %s, key: %s", event.bucket, event.key)

    # try to insert the song into the database
    try:
      add_song = ("INSERT INTO songs "
               "(title, album, artist, year, file, image, genre) "
               "VALUES (%s, %s, %s, %s, %s, %s, %s)")
      song_vals = (TITLE, ALBUM, ARTIST, YEAR, MP3, IMG, GENRE)
      cur.execute(add_song, song_vals)
      db.commit()

    except mysql.connector.Error as err:
      app.log.error("Failed to insert song: %s", err)
      db.rollback()

# perform a suffix match against supported extensions
def _is_json(key):
  return key.endswith(_SUPPORTED_EXTENSIONS)
- Be sure to update the name of your S3 bucket.
- Update the
baseurlof your S3 website address. - Parse the song metadata extracted into
data.
Once you have addressed any errors or malformed code blocks, you are ready to deploy your Lambda function. In Chalice, this is very simple. Run this command from within the directory containing your Chalice app:
chalice deploy
You can then view your function's details in the AWS Lambda Service Page.
NOTE: Be sure NOT to edit your function or any options within the AWS Lambda Service Page. Those changes will be overwritten the next time you run
chalice deploy.
To view the logs for your Lambda function, open the function from the list and click into the MONITOR tab below the Overview. Find the "View Cloudwatch Logs" button and open it. This will give you a view into logs. Refer to the video above to see how this works.
The first way to test your Lambda function is by uploading one of your song metadata files (.json) into the S3 bucket. Check to see if your function executed well, or not, by looking into the CloudWatch logs for your function.
If you are having serious problems with the SQL INSERT command, you can always create a separate piece of Python to run and execute by hand, in order to debug your syntax and structure. Knowing that your Lambda function will be given the bucket and key value, you can simulate that in a separate code snippet to test fetching the JSON file, reading it, extracting its values, and pushing those into a new SQL INSERT statement.
The instructional staff needs some information in order to grade your work:
- The URL to your GitHub repository for this project.
- The name of your S3 bucket for this project.
- The S3 website URL for this project displaying your DIY Spotify page.
- Also submit this form with some of the same information.
DO NOT stop your EC2 instance until instructed to. It needs to be running for your project to be graded!
This project is worth 15 points. Here is a breakdown of the grading rubric:
- Student has (at least) 10 songs loaded into their music player. (2 points)
- Student properly creates a database, loads schemas and data. (2 points)
- Student FastAPI connects to the database and displays table data. (3 points)
- Student FastAPI container is deployed into their EC2 instance. (2 points)
- Student web interface connects properly to their backend API and displays their songs. (2 points)
- Student solution ingests a new song uploaded by instructional staff and displays it properly in the API and web interface without manual intervention. (4 points)
Possible Deductions
While completing the points above will earn up to 15 points total, you can have points deducted from an otherwise-successful project:
- If you commit database credentials to git/GitHub and push them, you will lose 3 points.
- If songs appear in your web interface but cannot be played, you will lose 1 point.